

Easy Configuration Sharing with Azure Key Vault
Developers using Azure for the first time often wonder how to centralize configuration data needed by multiple services. In this post, I will demonstrate a reusable .NET library which provides secure access to shared configuration data with a single line of code. I have used this technique to store connection strings for Azure resources such as databases, storage, and service bus topics, each used by multiple Azure App Service websites, Azure Functions, and other utility classes within the same library. This technique is not limited to connection strings. You could, for example, store access keys for external APIs.
Secure Storage and Retrieval of Configuration Data
In this post we will to use an Azure HTTP-triggered Function to grant permission to a web application to upload a file to Azure Blob Storage, then use a Storage Trigger Function to log the file’s arrival in a database. The post assumes you already have some familiarity with provisioning and using other Azure services. The shared configuration data will be the Storage and SQL connection strings.
- Azure services and settings
- Create a Key Vault service
- Add configuration data to the vault
- Enable Managed Service Identity
- Grant access to other services
- Build the library
- Target .NET Standard 2.0
- Add package references
- Access Key Vault secrets
- Helper class to request secrets
- Helper class to write Log entries
- Use the library
- Reference the library
- Query the helper class
The code portion of this post was written using Visual Studio 2017 Community Edition v15.5.2. If you haven’t added Azure support to your IDE, you must run the Visual Studio 2017 Installer, click Modify, and add the “Azure development” workload in the “Web & Cloud” section of the installer.
Create a Key Vault Resource
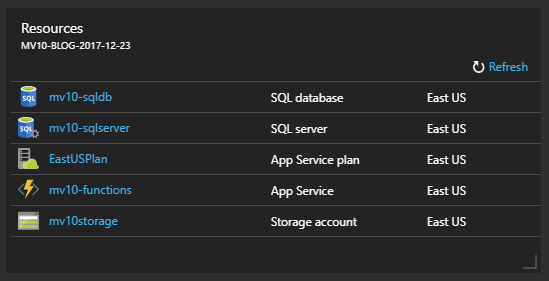
Since this post is focused on Key Vaults, I will not go into detail about creating and using these other Azure services. You can see below that I have already prepared a Resource Group containing a Storage Account (mv10storage), a Function App (mv10-functions, currently empty), and a SQL Server (mv10-sqlserver and mv10-sqldb) which hosts our demo log table (timestamp and description). EastUSPlan is the consumption-based provisioning plan automatically created for Function Apps. We haven’t provisioned any services to host a website. For simplicity, I left the Function App open to anonymous access without CORS restrictions – obviously this would be a Very Bad Idea in real life, even in dev, but the Resource Group will be gone by the time you read this.
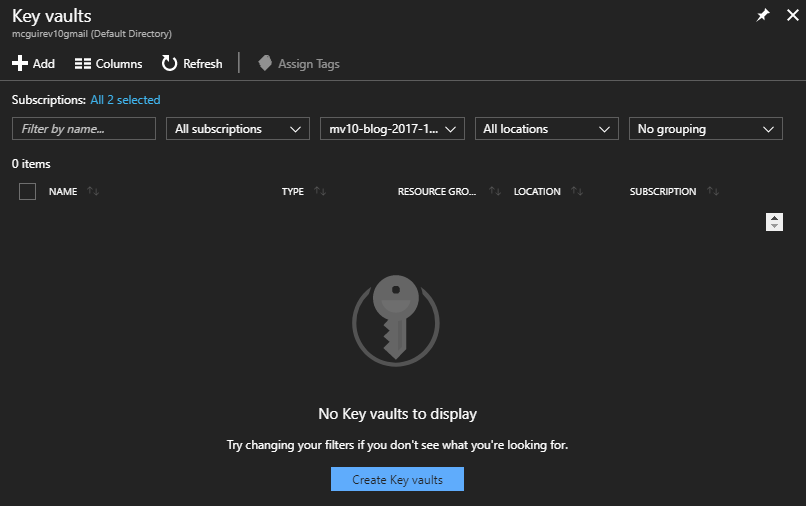
Before we can begin, we must add a Key Vault Service to this Resource Group. There are several ways to do this from the Portal. In this case, I clicked Key Vaults in the side bar, which loads a “blade” (Portal-speak for UI panes) listing provisioned Key Vaults. I could use the “+ Add” button at the top left of this blade, but since there are no Key Vaults listed yet, I can also click the “Create Key Vaults” button in the center. Both lead to the same provisioning process.
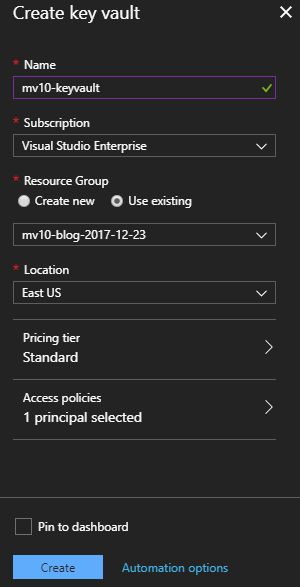
Setting up a Key Vault is much like any other Azure service: assign a name, subscription, resource group, and location. Both pricing tiers are inexpensive – at the time of writing, the Standard tier was estimated at just 3 cents per month, but the Premium tier was only $1.03 per month. The Standard tier uses software encryption, but the Premium tier uses Thales Hardware Security Modules, extremely secure dedicated key storage devices. For the purposes of this post we chose the Standard tier, but any real app should probably just choose Premium since the cost is trivial. We’ll discuss access policies in the next section. For now, that area defaults to your Portal username.
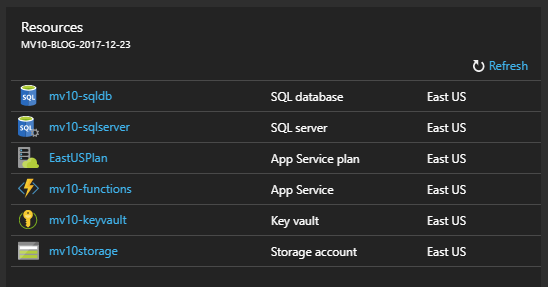
After about ten seconds, the new Key Vault appears in our Resource Group, ready to use.
Add Configuration Data to the Vault
Our demonstration project needs to store two connection strings – one to access the SQL database, and another to access the Blob Storage service. Key Vault can store three kinds of data: cryptographic keys, x509 certificates, and up to 25k of unstructured data called “secrets”. Since we want to store connection strings, we’ll be using the “secrets” feature.
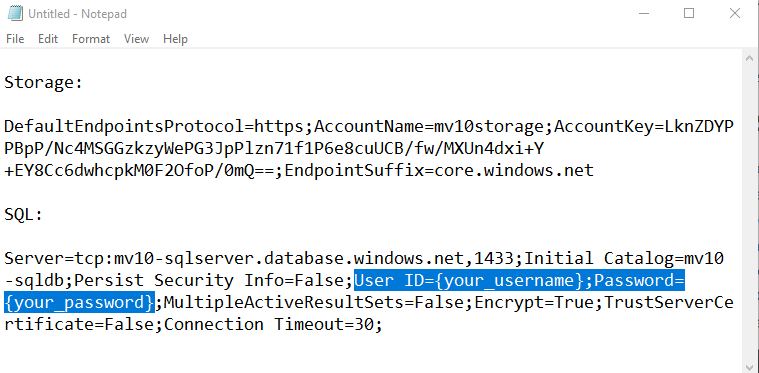
We’ll have to cut-and-paste our connection strings from the Storage and SQL blades. I find it’s easiest to just paste everything into Notepad temporarily. It’s faster than jumping back and forth between the individual resources and the Key Vault. Also, you need to manually add your SQL database user ID and password to the connection string, and it’s easier to edit in Notepad. The Storage connection string can be found on the Access Keys page for the Storage resource, and the SQL connection strings are available from the Connection Strings view about halfway down the list of links at the left in the Settings section. (Once again, by the time you read this, these resources will have been deleted, so it doesn’t matter that I’m exposing these keys – normally you would never expose these.)
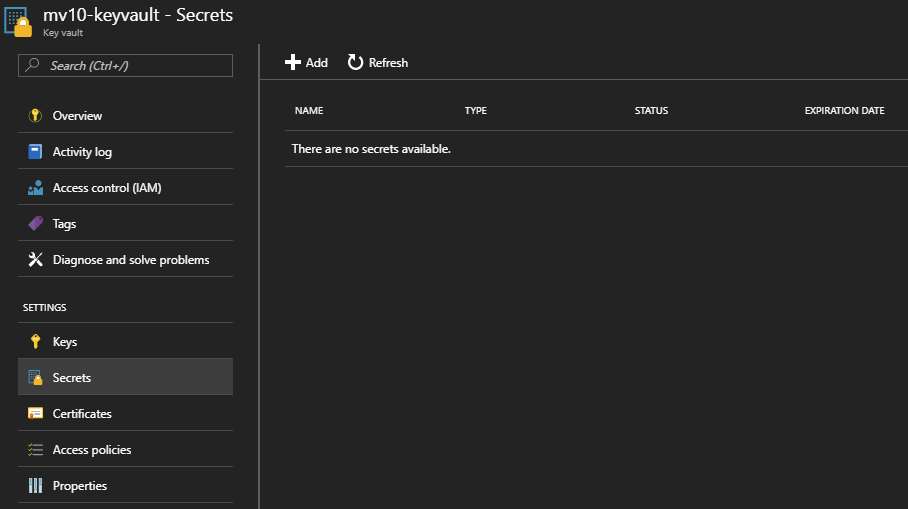
Returning to the Resource Group and selecting the Key Vault resource leads to a typical-looking Azure blade. About halfway down the list of links under “Settings” you’ll find the “Secrets” link, which opens an empty list of Key Vault secrets.
Key Vault secrets are just a list of name/value pairs. This means you should establish consistent policies regarding the naming of your stored secrets. Keep in mind that Key Vault doesn’t currently support deployment slots, but I believe separate Key Vaults per deployment slot is a good solution (remember, they’re cheap). Another criticism of the current Key Vault implemenation is that access is an all-or-nothing affair. If your resource can retrieve one secret, it can retrieve all of them, so that’s another strong argument for separate values per deployment slot. For the purposes of this demo, we’re keeping it simple, one vault using obvious names: sql-connection-string and storage-connection-string.
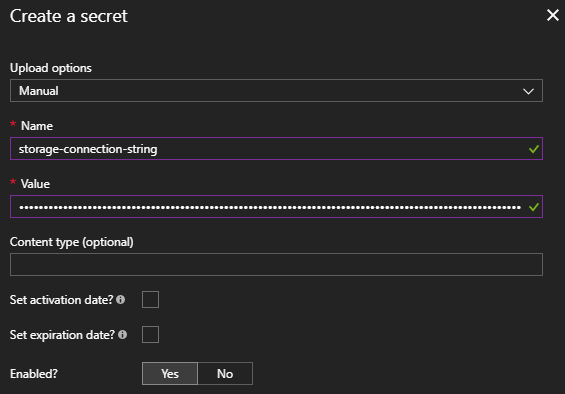
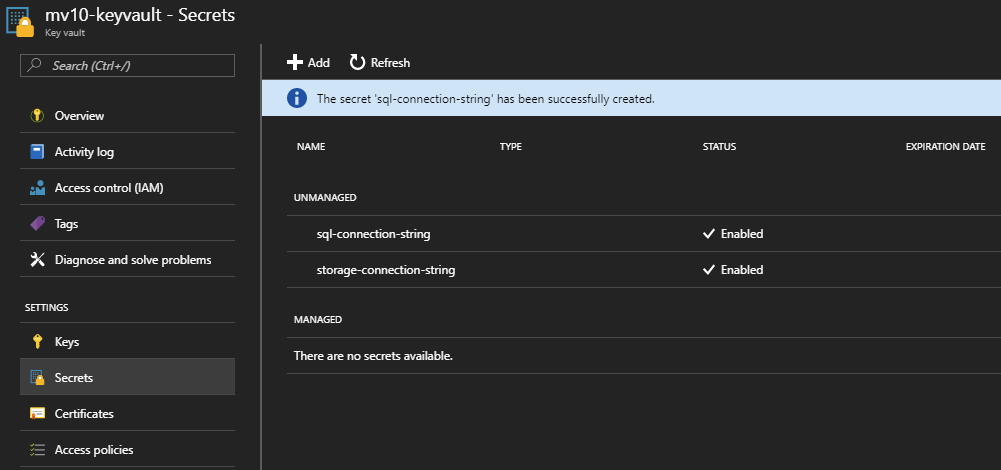
Clicking the “+ Add” button opens a simple dialog. “Upload options” should be changed to “Manual” and the Name and Value fields are self-explanatory. Below, we’re creating the storage-connection-string secret, then we’ll do the same for a sql-connection-string. Both are then visible in the view which lists the Key Vault secrets.
Grant Access to Other Services
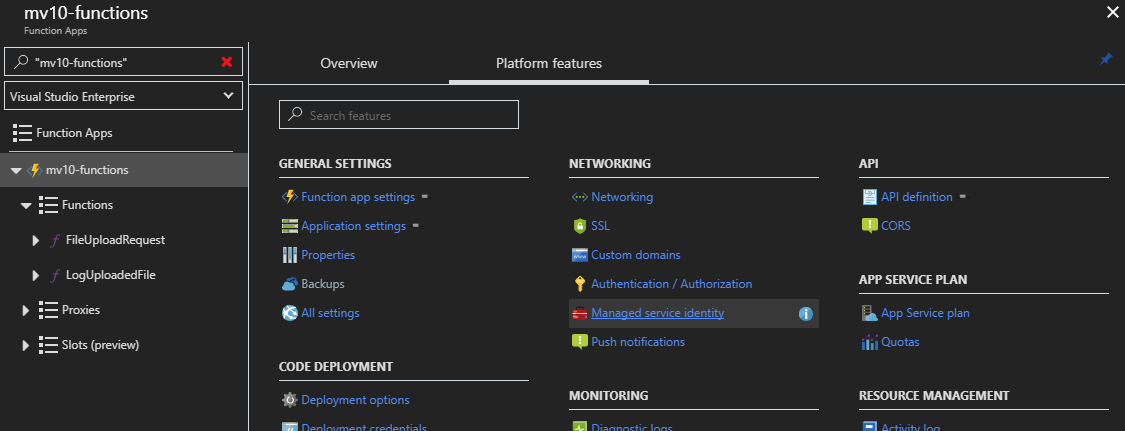
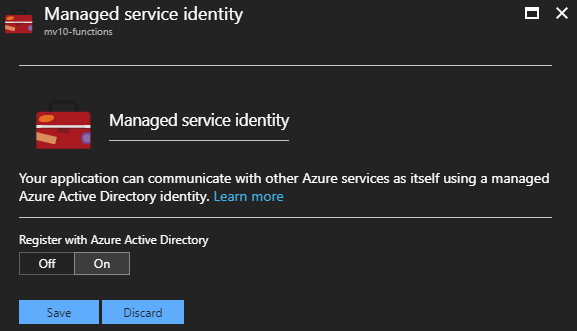
Now that we have securely stored our connection strings, we must grant access to each individual resource which needs them. In the case of our demo project, only the Functions App requires access. Resources are granted access through “Managed Service Identities,” which are not enabled by default. On the Functions App blade, choose the Platform Features tab. A link to Managed Service Identity can be found under the Networking links. Clicking the link opens a simple panel with just one option: Off or On. Of course, we want this On so that we can reference this resource’s identity in the Key Vault.
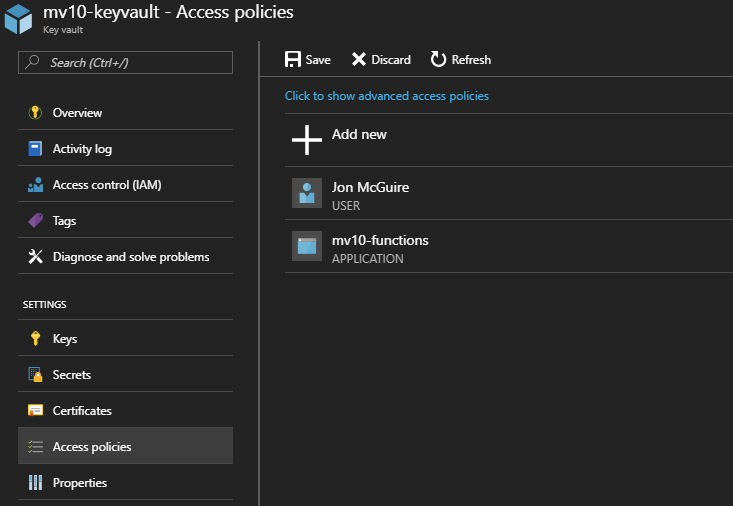
Returning to the Key Vault resource, you can find the Access Policies link on the left, just below the Secrets link we clicked earlier. This opens a view of the existing Access Policies, of which there is only one – your Portal account, which has full admin rights to the vault.
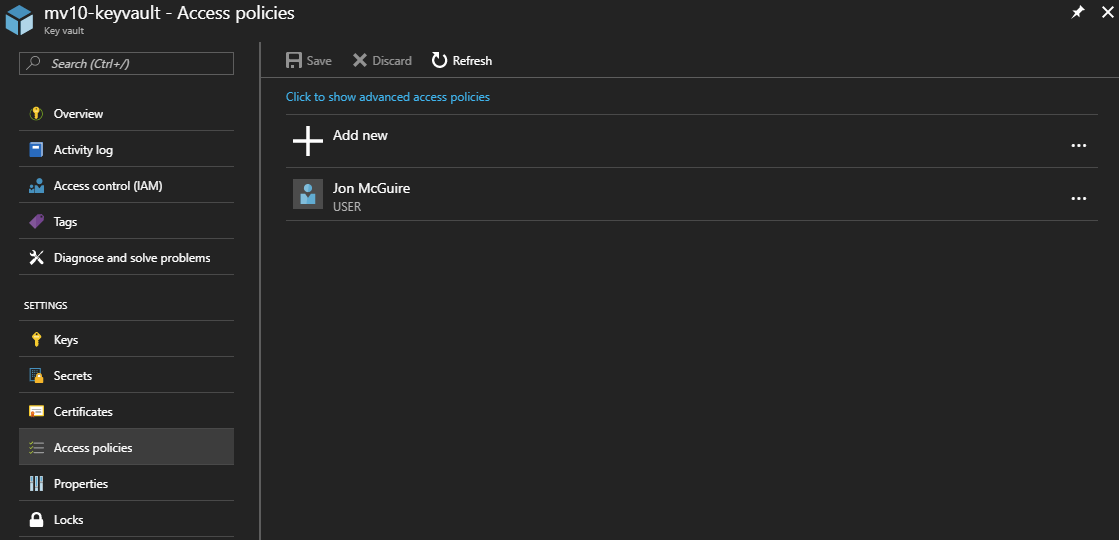
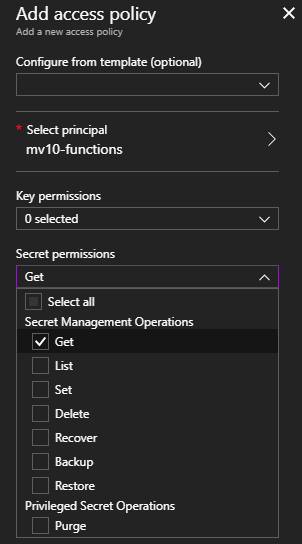
Clicking “+ Add new” opens the Add Access Policy blade.
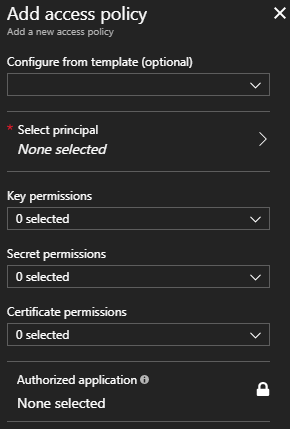
Clicking “Select Principal” opens a new blade where we search for the resource that requires access. (In security-speak, a “principal” is anyone or anything that has associated claims, roles, or permissions.) The search updates as we type, so “mv” is enough to identify the Function App named “mv10-functions”. We then click the Function App and the Select button, which returns us to the Add Access Policy blade.

Since we’re only interested in Key Vault secrets, and the Function App only needs to retrieve them, we open the Secrets drop-down and enable the “Get” permission.
Finally, we click “Ok” and the process is complete! When we return to the Access Policies list, the Function App is listed. We need only click the “Save” button to apply the changes. Now for the fun part… code!
Prepare the Class Library
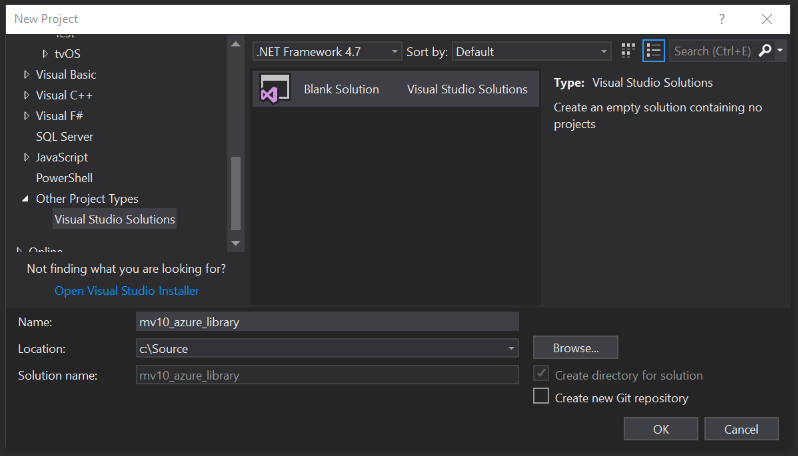
Since class library solutions often contain many different individual projects, my approach to class libraries is to begin with an empty solution so that I can assign it a sensible generic name, rather than tying the overall solution name to whatever specific project I happen to create first. Here I have opened VS2017 and chosen to create a Blank Solution named “mv10_azure_library”.
Each C# project in the solution will target .NET Standard 2.0. This way the library can be used by both .NET Framework and .NET Core applications. This is especially important for Azure development at this point in time. For example, Azure Functions v2, which is built upon .NET Core 2.0, only supports a few types of triggers, whereas v1, which uses the full .NET Framework, provides 18 types of triggers. On the other hand, you may wish to reuse the same library with an ASP.NET Core website. Ensuring that the library assemblies adhere to the base API specified by .NET Standard 2.0 make them available on either platform.
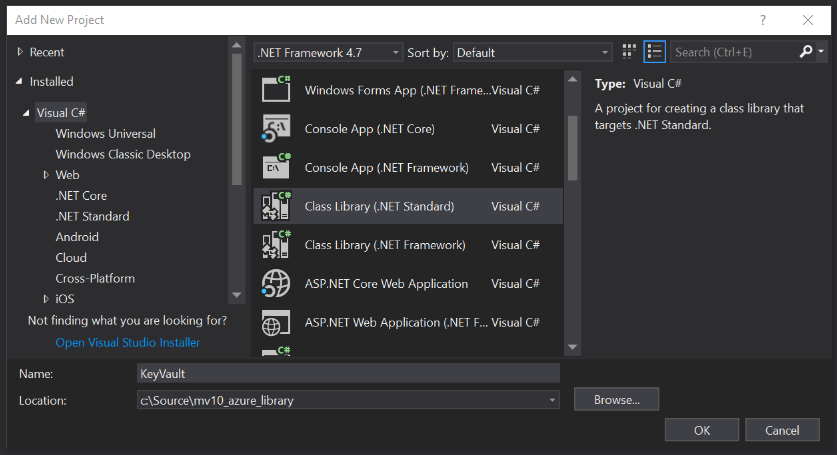
Next, add a new C# project to the solution. Choose “Class Library (.NET Standard)” as the project type and name it “KeyVault”. Ignore the dropdown that reads “.NET Framework 4.7” – the Visual Studio team has an open issue to fix this, but apparently there are deep internal dependencies which makes it a very complex problem to solve. After the project is created, right-click on the project name and choose the “Edit KeyVault.csproj” option. You will see the project is indeed targeting .NET Standard 2.0.
1
2
3
4
5
6
7
<Project Sdk="Microsoft.NET.Sdk">

  <PropertyGroup>
    <TargetFramework>netstandard2.0</TargetFramework>
  </PropertyGroup>

</Project>
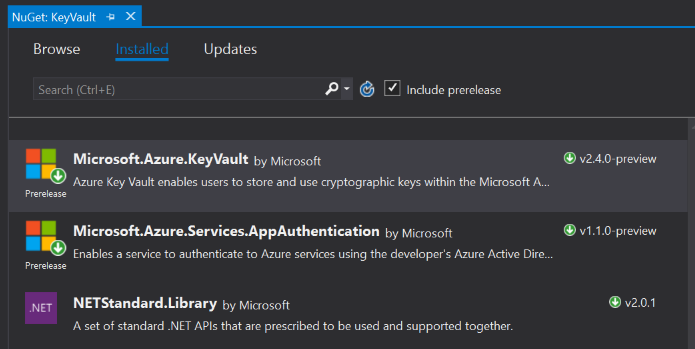
Just two Azure packages must be added to your project from NuGet:
- Microsoft.Azure.KeyVault
- Microsoft.Azure.Services.AppAuthentication
Accessing Key Vault Secrets
Within the KeyVault project, create a new class named KeyVaultCache:
1
2
3
4
5
6
7
8
9
10
11
12
13
14
15
16
17
18
19
20
21
22
23
24
25
26
27
28
29
30
31
32
33
34
35
36
37
using System.Collections.Generic;
using System.Threading.Tasks;
using Microsoft.Azure.KeyVault;
using Microsoft.Azure.Services.AppAuthentication;

namespace mv10_azure_library.KeyVault
{
    public static class KeyVaultCache
    {
        public static string BaseUri { get; set; } = @"https://mv10-keyvault.vault.azure.net/secrets/";

        private static KeyVaultClient _KeyVaultClient = null;
        public static KeyVaultClient KeyVaultClient
        {
            get
            {
                if(_KeyVaultClient is null)
                {
                    var provider = new AzureServiceTokenProvider();
                    _KeyVaultClient = new KeyVaultClient(new KeyVaultClient.AuthenticationCallback(provider.KeyVaultTokenCallback));
                }
                return _KeyVaultClient;
            }
        }

        private static Dictionary<string, string> SecretsCache = new Dictionary<string, string>();
        public async static Task<string> GetCachedSecret(string secretName)
        {
            if(!SecretsCache.ContainsKey(secretName))
            {
                var secretBundle = await KeyVaultClient.GetSecretAsync($"{BaseUri}{secretName}").ConfigureAwait(false);
                SecretsCache.Add(secretName, secretBundle.Value);
            }
            return SecretsCache.ContainsKey(secretName) ? SecretsCache[secretName] : string.Empty;
        }
    }
}
As mentioned earlier, the possibility of Key vault resource exhaustion means it’s a good idea to cache both our connection and any secrets we retrieve. This class uses a singleton pattern on a KeyVaultClient object, which represents the collection, and a Dictionary of string key-value pairs to represent retrieved secrets and their values.
For the sake of simplifying an already-long post, the Key Vault URI is hard-coded into this method. This would make more sense stored as a configuration item on any resource that needed Key Vault access. Yes, that makes it a non-shared configuration item, but it is easier (and more secure) to manage one URI than it is to make many multiple copies of many different connection strings throughout your project. Also, by referencing different Key Vault URIs in the configuration of your different deployment slots, you could achieve slot-level configuration sharing as described earlier.
Consumers of this class need only call await GetCachedSecret(secretName) to retrieve configuration information. But we can make it even easier…
A Helper Class for Ease-of-Use
Rather than having to remember the different names associated with the project’s configuration secrets, I find it useful to create a simple helper class with methods dedicated to each secret:
1
2
3
4
5
6
7
8
9
10
using System.Threading.Tasks;

namespace mv10_azure_library.KeyVault
{
    public static class GetSecret
    {
        public static async Task<string> SqlConnectionString() => await KeyVaultCache.GetCachedSecret("sql-connection-string");
        public static async Task<string> StorageConnectionString() => await KeyVaultCache.GetCachedSecret("storage-connection-string");
    }
}
Now a consumer can retrieve the secret SQL connection string merely by calling await GetSecret.SqlConnectionString().
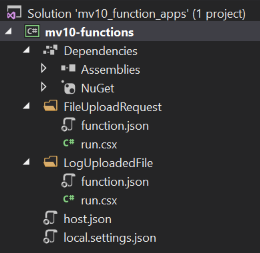
Using the Library
Although you can create Azure Functions directly from the Portal, and you can even download the code to edit them in Visual Studio, they use a slightly different file format (.csx) that isn’t clearly documented. If I created my functions in the Portal then retrieved them using the “Download app content” button on the Functions blade in the Azure Portal, the downloaded csproj would show the following in Solution Explorer.
However, I don’t see any benefit to this process. It takes longer, I’ve had deployment problems, and frankly I just don’t like the weird pseudo-C# syntax of the .csx filetype (I hesitate to call it a class file). Instead, I prefer to create a new Azure Functions project from Visual Studio, then add new Functions via Solution Explorer as needed. When you follow that process, the Functions are created as normal C# classes. (These details are also beyond the scope of the article, although you’ll see the full code momentarily.)
The FileUploadRequest is used by a web application to retrieve a time-limited Blob Storage URI that is authorized to create a specific filename in a specific container. The details are beyond the scope of this article, but I want to stress that the following code is demo-quality only. For example, the CloudBlobClient should be cached. More importantly never put code like this into an anonymous-access HTTP Function, or anyone in the world can request authorization to upload files to your storage.
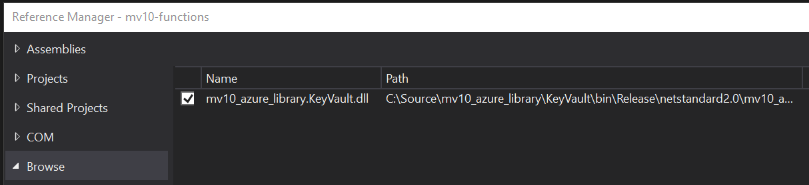
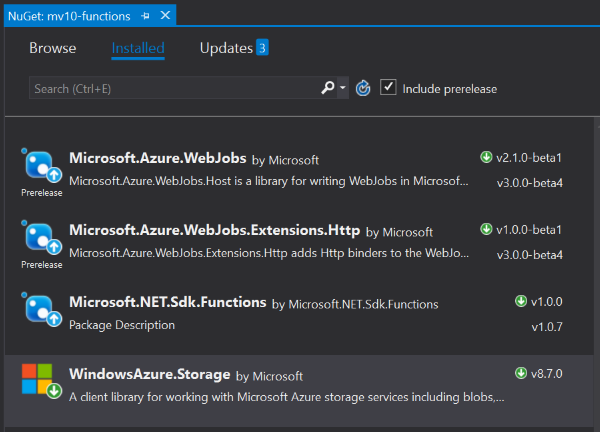
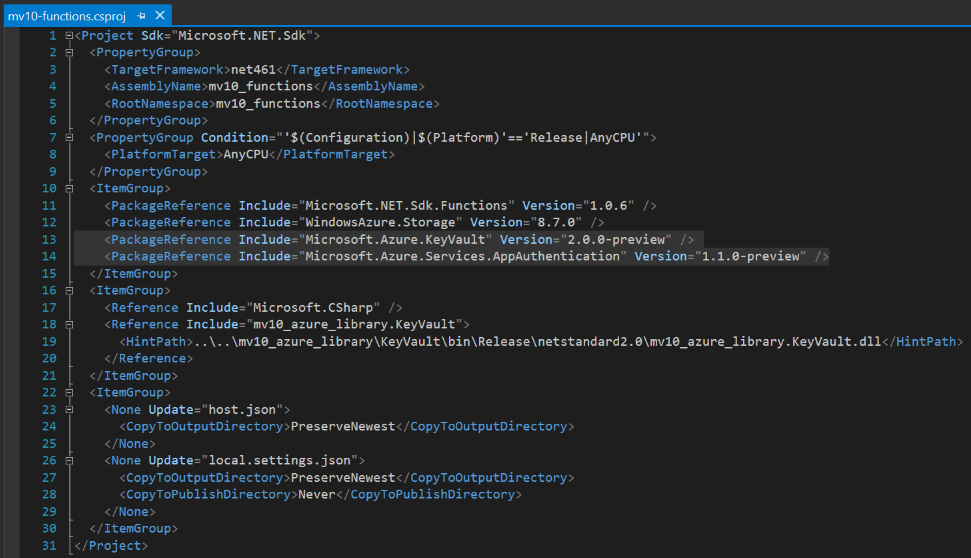
First, we add a reference to our new library assembly, and then we need one Azure NuGet package. The other packages in the screen shot were already referenced by the csproj we downloaded from the Portal.
- mv10_azure_library.KeyVault.dll
- Windows.Azure.Storage
The code is shown below. You can see the one-line call to our helper function on line 25: await GetSecret.StorageConnectionString() … secure configuration-secret sharing doesn’t get much easier than that!
1
2
3
4
5
6
7
8
9
10
11
12
13
14
15
16
17
18
19
20
21
22
23
24
25
26
27
28
29
30
31
32
33
34
35
36
37
38
39
40
41
42
43
44
45
using System;
using System.Net;
using System.Net.Http;
using System.Threading.Tasks;
using Microsoft.Azure.WebJobs;
using Microsoft.Azure.WebJobs.Extensions.Http;
using Microsoft.Azure.WebJobs.Host;

using Microsoft.WindowsAzure.Storage;
using Microsoft.WindowsAzure.Storage.Blob;
using mv10_azure_library.KeyVault;

namespace mv10_functions
{
    // WARNING: DEMO ONLY -- VERY INSECURE
    public static class FileUploadRequest
    {
        [FunctionName("FileUploadRequest")]
        public static async Task<HttpResponseMessage> Run([HttpTrigger(AuthorizationLevel.Anonymous, "get", Route = null)]HttpRequestMessage req, TraceWriter log)
        {
            string filename = Guid.NewGuid().ToString("N");
            string response = string.Empty;
            try
            {
                var storageAccount = CloudStorageAccount.Parse(await GetSecret.StorageConnectionString());
                var client = storageAccount.CreateCloudBlobClient();
                var container = client.GetContainerReference("file-uploads");       // permissions tied to this blob container only
                var blob = container.GetBlockBlobReference(filename);               // permissions tied to this blob filename only
                var policy = new SharedAccessBlobPolicy()
                {                                                                   // permissions are time limited:
                    SharedAccessStartTime = DateTimeOffset.UtcNow.AddMinutes(-2),   // start time 2 minutes earlier to compensate for clocks out of sync
                    SharedAccessExpiryTime = DateTimeOffset.UtcNow.AddMinutes(2),   // access token is valid for 2 minutes into the future
                    Permissions = SharedAccessBlobPermissions.Create                // create-rights only
                };
                var token = blob.GetSharedAccessSignature(policy);
                response = $"{container.Uri}/{filename}{token}";                    // the complete URI for the clients REST API call to storage
                return req.CreateResponse(HttpStatusCode.OK, response, "text/plain");
            }
            catch
            {
                return req.CreateResponse(HttpStatusCode.InternalServerError);
            }
        }
    }
}
Similarly, the LogUploadedFile Function begins with a one-liner call to retrieve the SQL connection string on line 17. This also is not production-quality code, but it does illustrate the use of our new helper libraries.
1
2
3
4
5
6
7
8
9
10
11
12
13
14
15
16
17
18
19
20
21
22
23
24
25
26
using System;
using System.IO;
using System.Threading.Tasks;
using Microsoft.Azure.WebJobs;
using Microsoft.Azure.WebJobs.Host;

using System.Data.SqlClient;
using mv10_azure_library.KeyVault;

namespace mv10_functions
{
    public static class LogUploadedFile
    {
        [FunctionName("LogUploadedFile")]
        public static async Task Run([BlobTrigger("file-uploads/{name}", Connection = "AzureWebJobsStorage")]Stream myBlob, string name, TraceWriter log)
        {
            SqlConnection conn = new SqlConnection(await GetSecret.SqlConnectionString());
            await conn.OpenAsync();
            string timestamp = DateTimeOffset.UtcNow.ToString("o");
            string message = $"File uploaded to blob storage: {name}";
            string command = $"INSERT INTO Log (Timestamp, Description) VALUES '{timestamp}', '{message}'";
            using(var cmd = new SqlCommand(command, conn)) await cmd.ExecuteNonQueryAsync();
            conn.Dispose();
        }
    }
}
In theory, you should be able to build and publish these Functions back into Azure, but something about the deployment packaging process seems to have a problem at the moment – any dependencies of the library project will not get published. Fortunately, there is an easy work-around. Open the library csproj and find the <PackageReference> entries and copy them to the Functions csproj (removing any duplicates). Now the project will build with all dependencies.
With that completed and published to Azure, we can use the Portal’s Function Apps testing tab to execute FileUploadRequest, and sure enough, we get back a Blob upload URI.

Demo Client
Even though we’ve already covered everything needed to securely share configuration data, we’ll wrap up with a simple demonstration of an actual file upload using the components we’ve built. As mentioned previously, this project isn’t about the client, so our Function Apps are not secure – only the internal retrieval of the connection strings themselves are secure in this simple example. Normally you’d have to concern yourself with issues like CORS and forcing HTTPS and so on.
So, with that in mind, the following web page will use a couple of XHR requests to request a new upload URI, then send a file there. The upload is triggered when a user browses to the file they wish to upload.
1
2
3
4
5
6
7
8
9
10
11
12
13
14
15
16
17
18
19
20
21
22
23
24
25
26
27
28
29
30
31
32
33
34
35
36
37
38
39
40
41
42
43
44
45
46
47
48
49
50
51
52
53
54
55
56
57
58
59
60
61
62
63
64
65
66
67
68
69
70
71
72
73
74
75
76
77
78
79
80
81
82
83
84
85
86
87
88
<html>
<head>
    <style>
        body { padding-top:20px; padding-left:20px; font-family:'Segoe UI', Tahoma, Geneva, Verdana, sans-serif; }
    </style>
    <script>
        var storageUri;
        var xhr;

        function requestUpload() {
            document.querySelector("#message").textContent = "Requesting upload authorization...";
            xhr = new XMLHttpRequest();
            xhr.open("GET", "https://mv10-functions.azurewebsites.net/api/FileUploadRequest");
            xhr.onreadystatechange = authProgress;
            xhr.onerror = authError;
            xhr.send();
        }

        function authProgress() {
            if (xhr.readyState == 4) {
                if (xhr.status == 200) {
                    storageUri = xhr.responseText;
                    document.querySelector("#output").style.display = "inline";
                    document.querySelector("#uri").textContent = storageUri;
                    document.querySelector("#message").textContent = "Uploading....";
                    upload();
                } else {
                    uploadError();
                }
            }
        }

        function authError() {
            document.querySelector("#message").textContent = xhr.responseText + " (" + xhr.status + ": " + xhr.statusText + ")";
        }

        function upload() {
            var target = document.querySelector("#file").files[0];
            document.querySelector("#filename").textContent = target.name;
            document.querySelector("#filesize").textContent = target.size;
            document.querySelector("#filetype").textContent = target.type;

            xhr = new XMLHttpRequest();
            xhr.open("PUT", storageUri);
            xhr.setRequestHeader("x-ms-blob-type", "BlockBlob");
            xhr.setRequestHeader("x-ms-blob-content-type", target.type);
            xhr.setRequestHeader("Content-Length", target.size);
            xhr.onreadystatechange = uploadProgress;
            xhr.onerror = uploadError;
            xhr.send(target);
        }

        function uploadProgress() {
            // Success returns HTTP 201 (Created).
            if (xhr.readyState == 4) {
                if (xhr.status == 201) {
                    document.querySelector("#message").textContent = "UPLOAD COMPLETE";
                } else {
                    uploadError();
                }
            }
        }

        function uploadError() {
            document.querySelector("#message").textContent = xhr.responseText + " (" + xhr.status + ": " + xhr.statusText + ")";
        }
    </script>
</head>
<body>
    <h1>File Upload Test</h1>
    <p>
        <strong>Choose a file to begin:</strong>:<br />
        <input type="file" id="file" name="file" style="width:50%" onchange="requestUpload()" />
    </p>
    <div id="output">
        <strong>Storage URI:</strong><br />
        <p><span id="uri"></span></p>
        <strong>File Properties:</strong><br />
        <p>Name: <span id="filename"></span></p>
        <p>File Size: <span id="filesize"></span> bytes.</p>
        <p>File Type: <span id="filetype"></span></p>
        <p>
            Result:<br/>
            <span id="message"></span>
        </p>
    </div>
</body>
</html>
This is what the page looks like after successful execution:
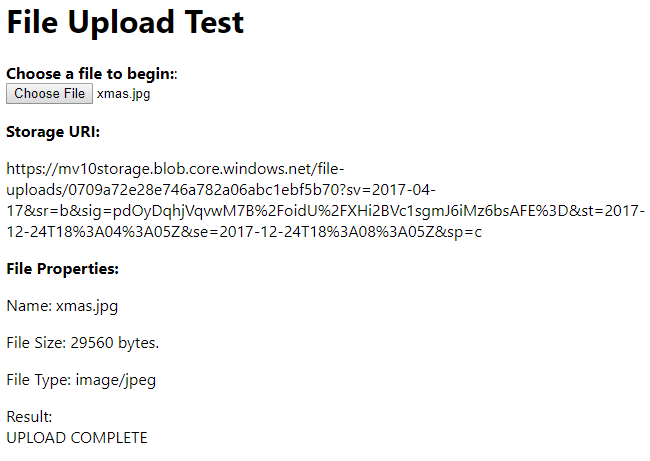
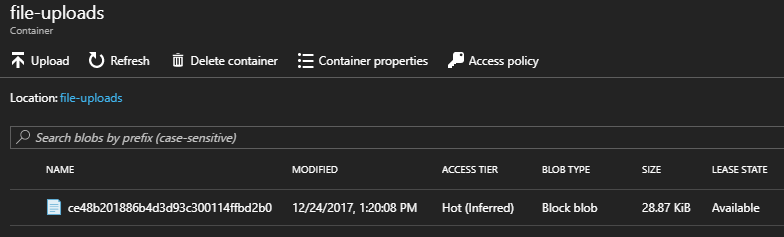
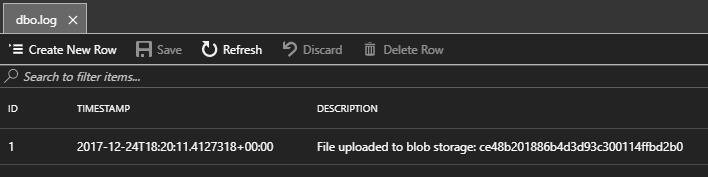
Additionally, we can see the file in Blob Storage (remember, part of the URI returned by the Function assigned a GUID as the filename), and the LogUploadedFile was triggered by the upload operation – we can see the entry in the SQL database.
Conclusion
Although this lengthy post may give you the impression that secure shared configuration data is complex, in reality once you’ve gone through the process a couple of times (and have some handy utility libraries in your toolbox), it’s relatively quick and easy to add new configuration data to any Azure project.
Please don’t hesistate to ask questions in the comments, or to point out errors or issues.


Comments