
Monkey Hi Hat OpenGL Multi-Pass Rendering
How framebuffer-based multi-stage post-processing works.
I’ve been writing a series of articles about my new Monkey Hi Hat music visualizer (repo and releases), starting with the introductory article a few weeks ago. Since then, I’ve made some pretty significant improvements, including a version 2 release just a couple of days ago, which includes an important new feature: multi-pass rendering. See the previous articles for other details about Monkey Hi Hat and the various libraries, this article is focused on multi-pass.
I have also created a stand-alone example in my opentk-multipass-demo repository which, as the name suggests, is primarily “pure” OpenTK (the exception being the conveneince of the Shader class from my eyecandy library, since the details of loading and compiling shaders is irrelevant to the technique.) Since that example also lets the user view the results of any stage of processing, I’m using it for some of the screenshots in this article. (Currently Monkey Hi Hat has no such facility, although that is planned, it’s handy for visualizer debugging.)
Edit: Check the Releases page for the newest version and a fully-automated stand-alone install program.
The Leeloo Release
Why an entire article specifically focused on multi-pass rendering? From the Monkey Hi Hat standpoint, apart from just being cool, it’s a pretty important new feature: it made visualizer cross-fading rationally possible, and in a future release, it will allow me to add randomized post-processing effects. I hope these effects will eventually make Monkey Hi Hat as interesting and varied as the famous MilkDrop, yet much easier to use – high aspirations indeed!
Another reason from the standpoint of a writer is that the Monkey Hi Hat articles represent a bit of a deviation from most of what I’ve written over the years. My articles have tended to be “how-to” focused on relatively narrow technologies. I get about 45,000 to 65,000 page-views most months (occasionally up to 100,000), and my most popular article by far is still How to Close a WebSocket (Correctly), written a little over four years ago. I think this topic will prove both useful and interesting. I don’t monetize the site at all (I loathe web-style spam-trash advertising, and the tax implications of feeding our bloated welfare-state means the money would never be enough to warrant the cost, risk, and effort of generating income), so this is mostly about helping people.
Speaking of the topic of helping people, when I decided to implement this feature, I realized a lot of people struggle to understand how OpenGL multi-pass rendering works. There are mostly-unanswered questions about this all over the web. Usually it goes like this: somebody posts a question to SuperUser or StackOverflow about “multipass shaders” and then some pedantic basement-dweller dev with a bit of OpenGL experience derails the whole thing by pretending not to understand the question. That’s because there is no concept at the shader level, specifically. This kind of nonsense is extremely annoying to me, plus, mentioning it means the phrase “multipass shaders” gets indexed for this article. Bonus! If you found this article that way, mission accomplished, right?
Anyway, on to the good stuff.
Pretty Pictures
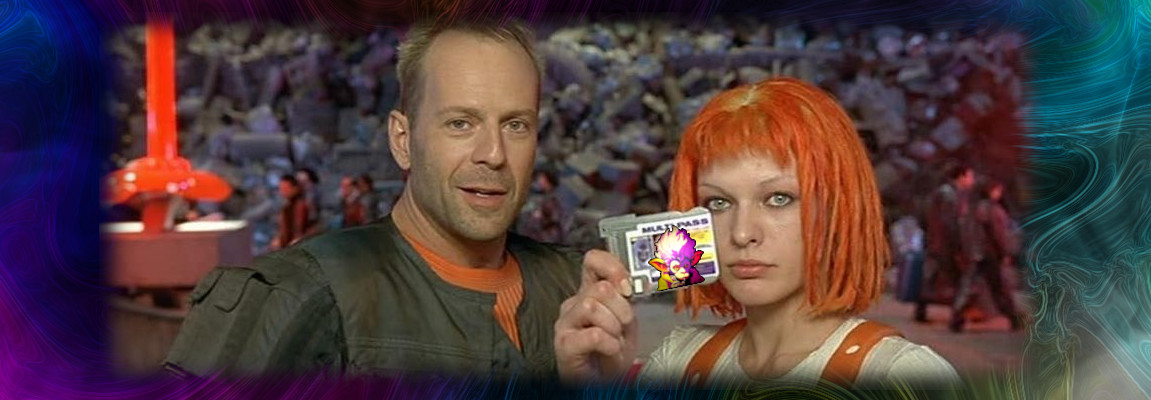
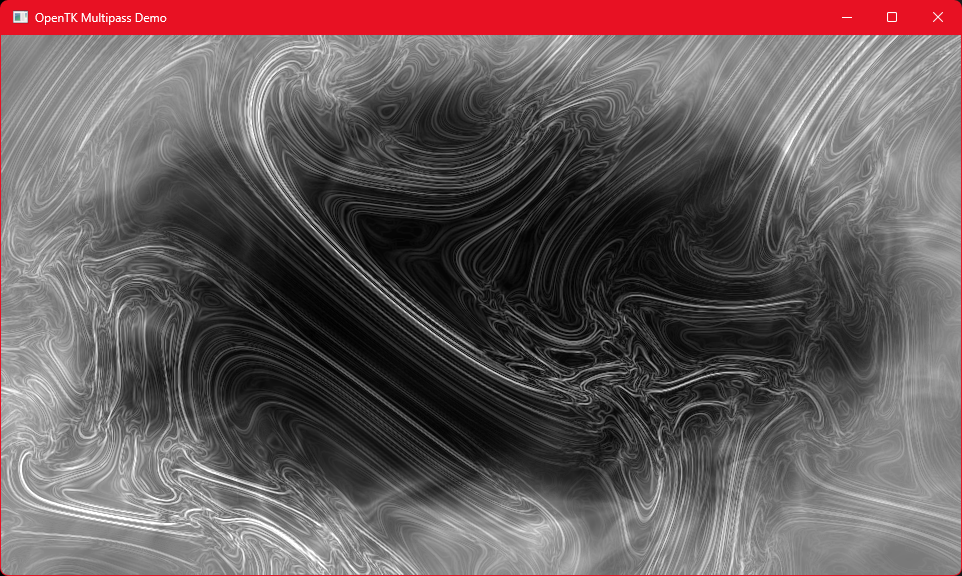
So what is this all about? The background of the article header includes a screenshot from the output of the multipass demo repository, but the demo repo’s README has this full screenshot, sans Corbin Dallas and Leeloo:

That output is the result of five rendering passes – which means five different shaders. This is why Mr. Snooty on StackOverflow feigns puzzlement over the term “multipass shader” – the rendering process might be multipass, but the shaders are not. Other common terms for this are post-processing, post-effects, or post-FX, although that has traditionally been more about video and photography than computer graphics. Game engines in particular have popularized those terms for rendering, as they often supply generic special-effect renderers like “film grain” or “CRT scanlines” – all of which could be rendered now by Monkey Hi Hat.
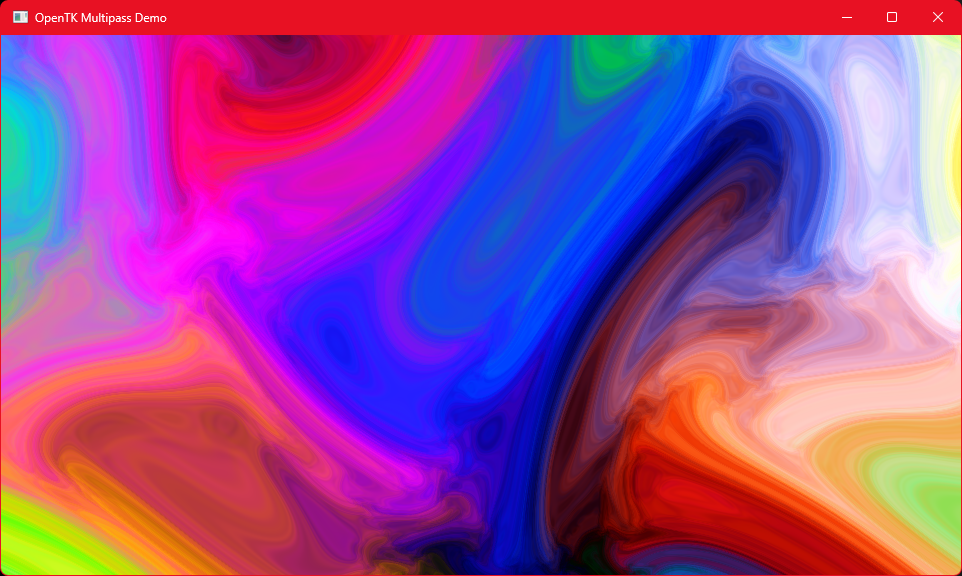
In this demo, these are the five stages, four of which were adpated from Shadertoy code for expediency, since my focus is the application, not the shaders:
- Render a plasma field (credit:Simple Plasma)
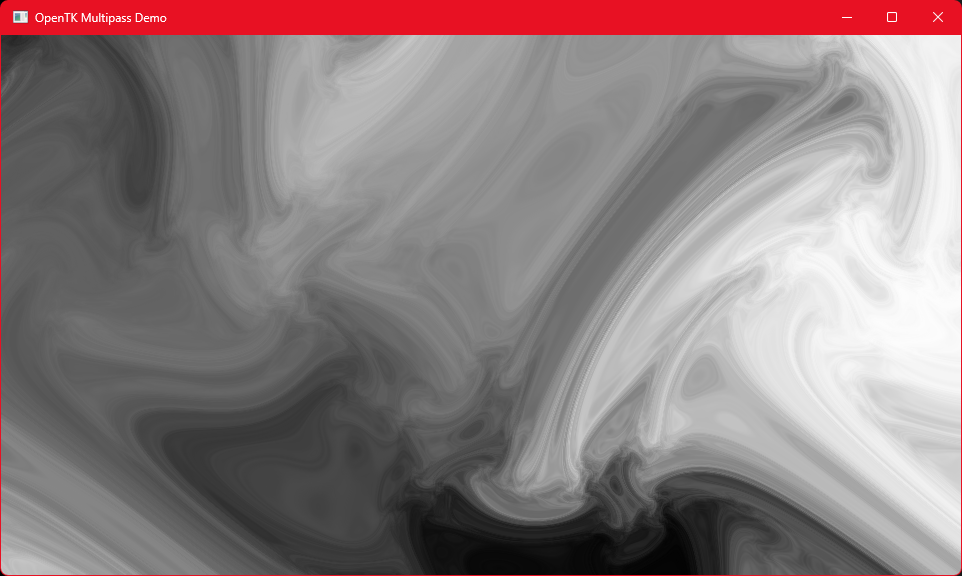
- Desaturate (grayscale) that output (credit: Desaturate filter)
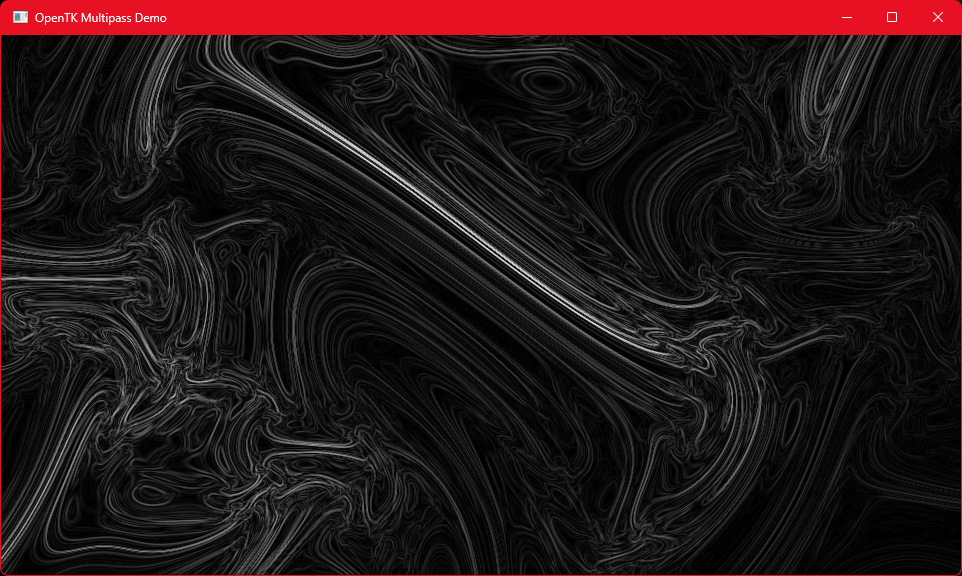
- Apply Sobel edge-detection (credit: Sobel Operator 2D)
- Overlay a cloud border effect (credit: Foamy Water)
- Use the original plasma field output to colorize the result (credit: me)
The neat thing about the stand-alone multipass demo is that you can hit the spacebar to “interrupt” the processing stages at any point and output the results of that stage to the screen. Here are the five stages described above:
Pass 1: Plasma Field
Pass 2: Desaturation
Pass 3: Sobel Edge-Detection
Pass 4: Add Cloud Border Overlay
Pass 5: Colorize from Original Buffer

Now that you’ve seen the result of these render passes, we’ll quickly discuss the basic concept.
Draw and Read Buffers
OpenGL has something called a FramebufferObject and for our purposes, the important feature is that they can “attach” graphical texture objects to these. Then you can tell OpenGL “I want my shader to draw to framebuffer X” and, optionally, “I want my shader to be able to read from framebuffers X, Y, and Z”. As you can see from the OnRenderFrame method in the Win.cs class in the demo repository, juggling these framebuffer textures is the key to multi-pass rendering.
The five-pass example only requires three framebuffers. If we number them 0, 1, and 2, it looks like this:
| Draw | Read | Redering Pass |
|---|---|---|
| 0 | none | Render a plasma field |
| 1 | 0 | Desaturate the plasma field output |
| 2 | 1 | Sobel edge-detection of the desaturated output |
| 1 | 2 | Mix a cloud border into the edge-detection output |
| 2 | 0,1 | Colorize the results using the original plasma field output |
Since we want to use buffer 0 for input in the final pass, we draw to it only once. Buffer 0 also becomes an input to the second pass, which means it is declared as a sampler2D uniform to the pass 2 desaturation shader.
We continue this process of shuffling around the buffers until the final pass, which draws to buffer 2, but uses two earlier outputs as input textures – the original full-coverage plasma field still in buffer 0, and the most recent output to buffer 1, the the wisply cloud border that pass 4 overlaid on the results of the pass 3 edge detection.
You could name these input uniforms anything you want, but for the demo I found it easiest to use “inputN” where N matches the buffer number. So the fourth pass declares input2 whereas the final pass declares input0 and input1 as texture uniforms.
After the fifth pass, some additional code is added to blit (a very old computer graphics term that simply refers to a high-speed bulk-memory-copy operation) the contents of the buffer 2 texture to OpenGL’s back buffer, then the standard OpenGL SwapBuffer command makes the back buffer the front (visible) buffer and the results appear on-screen.
Monkey Hi Hat Abstractions
One of my primary goals with Monkey Hi Hat was to make it relatively easy to create interesting visualizations. Although it’s fair to say Ryan Geiss’ MilkDrop is the gold-standard for visualizations, it was written before the era of dedicated GPUs and modern shaders. He had to basically invent a pseudo-shader-language to allow customization, which are called presets. The instructions are long and complex, and preset files are hard to write and nearly impossible to understand (check out this randomly-selected example from the web-based ButterChurn implementation). The results are amazing but frankly it’s more effort than I was willing to invest. And, of course, it’s the 21st century and we do have insane GPU horsepower at our fingertips.
But even the modern stuff requires some effort. If you take a look at the source code for the multipass demo repository, you’ll find that the simple-sounding five-step operation described earlier is actually a fairly lengthy collection of OpenGL operations. Ten commands to initialize every framebuffer and texture, multiple commands to prepare for each pass, careful allocation of OpenGL texture units to avoid collisions, coordination of shader uniform declarations and mapping buffer textures to the same names, and so on.
I wanted to sweep all of this under the rug. To a large extent, defining a multi-pass visualization in a Monkey Hi Hat visualizer configuration file is not much more complicated than the table in the previous section showing buffer usage.
In fact, this is the entire visualizer configuration file (sans explanatory comments) needed to implement the stand-alone demo in Monkey Hi Hat (it’s here in the Monkey Hi Hat repository):
1
2
3
4
5
6
7
8
9
10
11
12
[shader]
Description=Multipass visualizer test
VisualizerTypeName=VisualizerFragmentQuad
VertexShaderFilename=VisualizerFragmentQuad.vert
FragmentShaderFilename=fine-scale-plasma.frag

[multipass]
0 *   * *
1 0   * fx-desaturate
2 1   * fx-sobel-edge
1 2   * fx-cloud-fringe
2 0,1 * fx-colorize
That last part still looks a little cryptic now, but it’s essentially whitespace-separate columns and * generally means “use the defaults” unless a shader name is provided, as is the case in the last four steps. In any case, compare this to a MilkDrop preset file and you can see what I mean (of course, in all fairness you have to consider the shader source code files, too, but they’re still more comprehensible if you ask me – and trivially resuable).
The [multipass] Section
As you’ve no doubt realized, each line in the [multipass] section defines a separate shader pass. The line consists of four to six space-separated columns. The actual multipass.conf in the repository test directory has many lines of comments explaining this format, and also provides some column headings that help clarify things a bit better:
1
2
3
4
5
6
7
8
9
10
11
12
13
[shader]
Description=Multipass visualizer test
VisualizerTypeName=VisualizerFragmentQuad
VertexShaderFilename=VisualizerFragmentQuad.vert
FragmentShaderFilename=fine-scale-plasma.frag

[multipass]
# draw  inputs  vert  frag            viz/settings
  0     *       *     *
  1     0       *     fx-desaturate
  2     1       *     fx-sobel-edge
  1     2       *     fx-cloud-fringe
  2     0,1     *     fx-colorize
Column 1: Draw Buffer
The first column declares the draw-buffer number. These must begin at 0 and must not be declared with any gaps. If you’ve drawn to buffers 0 and 1, you can’t draw to buffer 3 yet because you haven’t drawn to buffer 2. But, as you can see above, you can draw to any already-used buffer in any order.
This probably rasises the question, “How many buffers can I use?” and the answer is, “Don’t worry about it.” They’re allocated on the fly and you’re probably going to choke the GPU before you could use enough buffers to matter. I’ll discuss it more later, but the true resource limitation is OpenGL texture units, and on my card with 192 available, a visualizer with 20 passes or more wouldn’t come close to those limits (assuming it could handle that much work and store that many full-screen textures without destroying the frame rate).
Column 2: Input Buffers
The second column declares comma-separated input-buffer numbers, or an asterisk to indicate the pass does not use any input buffers. For obvious reasons, you can only declare input buffers which have been drawn into previously, and you can’t declare a buffer as both the draw buffer and an input buffer on the same pass.
Columns 3 and 4: Shader Filenames
The third and fourth columns are the names of vertex and fragment shader files (in that order). The .vert or .frag extensions are added automatically and the full shader pathspec is searched. If you specify an asterisk, the pass will use the shader(s) declared in the configuration file’s [shader] section.
For example, the demo configuration uses * for all vertex shaders, which is the simple pass-through VisualizerFragmentQuad.vert shader commonly used with the VisualizerFragmentQuad visualizer type.
Because the [shader] section must specify a vertex and fragment shader filename, the demo [shader] section also references the fragment shader fine-scale-plasma.frag which is the frag shader for the first pass. Thus, the first pass specifies * * as the shader filenames, whereas subsequent passes specify other post-processing effects as frag shaders.
Column 5: Visualizer Type Name
Column 5 can simply be omitted (as in the demo above) to reuse the visualizer type defined in the [shader] section, or you may specify one of the available visualizer type names. Currently there are only two: VisualizerFragmentQuad and VisualizerVertexIntegerArray.
Column 6: Visualizer Settings
If you specify a visualizer type name, and that visualizer supports settings, you must also provide those settings in column 6. Currently this only applies to VisualizerVertexIntegerArray . The settings are the same as the visualizer settings you’d provide in a simple configuration, separated by a semicolon. For example:
1
VertexIntegerCount = 1000; ArrayDrawingMode = Triangles
And that’s all it takes from the visualization-creation standpoint.
The Implementation
In my previous article, Inside Monkey Hi Hat, I purposely ignored the details of multi-pass rendering because it’s relatively complicated. That article explains that a RenderManager creates and interacts with IRenderer objects, and MultipassRenderer implements that interface. When RenderManager finds a [multipass] section in the configuration, it creates this type of render. Like the single-pass renderer, the constructor receives a VisualizerConfig object.
A method called ParseMultipassConfig handles parsing and validating everything described in the previous section. Each pass populates a MultipassDrawCall object which has two groups of fields:
1
2
3
4
5
6
7
8
9
10
11
12
13
public class MultipassDrawCall
{
    // Data used during rendering
    public int DrawBufferHandle;
    public List<int> InputTextureHandle;
    public List<TextureUnit> InputTextureUnit;
    public CachedShader Shader;
    public IVisualizer Visualizer;

    // Data collected during parsing
    public int DrawBufferIndex;
    public List<int> InputBufferIndex;
}
As the comments indicate, the first group represents data used during rendering, and the second group represents data used during this parsing and initialization process – the “index” values are the draw and input buffer numbers used in the [multipass] section. These objects are stored in a class-level collection called DrawCalls (a “draw call” is a commonly-used term for what we’ve been referring to as a “pass” because the final OpenGL command is some variation on glDraw).
When that list is complete, the parser knows how many buffers are required, and it passes this to the program’s GLResourceManager, which returns a list of allocated framebuffers, attached textures, and texture unit assignments. The previous article explained how and why these are treated as “scarce resources” but momentarily we’ll discuss a few additional considerations.
Finally, a quick loop assigns the allocated resources to the rendering fields in the draw call objects, and the last draw buffer number is stored to a field called OutputFramebuffer which will be explained shortly.
When RenderManager calls the renderer’s RenderFrame method, it simply loops over those draw call objects and performs the various OpenGL calls to prepare the shader and the buffers for each pass, then invokes the visualizer object’s RenderFrame method to actually output to the active (bound) draw buffer’s texture.
Finally, a few lines of code blits the final draw buffer’s texture to OpenGL’s back buffer and the render loop is finished.
Crossfade Support
The previous article also mentioned a new crossfade effect when a new visualizer has been loaded. It does this by “intercepting” the output of the old and new renderers, so that it can “mix” them before sending the output to the display. To do this, it needs to know how to find the renderer output. I didn’t want to hard-code a dependency on specific renderer types, so instead it looks for an interface called IFramebufferOwner, which indicates that the renderer explicitly allocates framebuffers and associated resources.
During initialization, the crossfade renderer stores references to either internally-owned resources (framebuffer and texture handles, and texture units) or to the final draw call resources owned by the renderer. That interface requires a GetFinalDrawTargetResource method which returns the GLResources object used during the last draw call, which is where that OutputFramebuffer field in the multipass shader comes into play. The method also takes an interceptActive argument which a multi-pass renderer can use to skip the final operations to copy (blit) the last draw buffer to OpenGL’s back buffer, as these are relatively expensive operations, and they’re unnecessary because the multi-pass renderer isn’t directly outputting the results to the screen during crossfade.
Later, when the crossfade is finished, the new renderer (if it is multi-pass) will receive another call that sets interceptActive to false so that when the crossfade renderer is removed, the new renderer can resume direct screen output.
OpenGL Resource Scarcity
Earlier I mentioned you don’t realistically need to worry about how many draw buffers you use, but it’s still useful to understand what gets allocated and why. Until they’re actually filled with texture data, merely generating new framebuffers and textures is simply allocating handles. They’re just ID numbers that don’t point to anything yet. But other than GPU memory, the truly scarce resource is texture units, which are the “slot” numbers where the GPU stores texture data.
The previous article explained that there is an upper limit on the total number of texture units supported by a given graphics card, and also that they should be carefully and permanently allocated to a given texture buffer, since they represent storage slots, and changing these will result in large memory copy operations. This is one of the main reasons the GLResourceManager class was created.
There is also the problem that crossfade implies up to three multipass rendering operations could be happening at once – the old renderer, the new renderer, and the crossfade render itself. Since the multipass renderers represent their buffer requirements as simple 0-based index values, a higher level of abstraction was needed to make sure those index values point to discrete underlying OpenGL resources. In other words, both the old and new renderers will declare a buffer 0, buffer 1, and so on, so the program can’t simply use texture unit 0 and texture unit 1 for both renderers (at least, not efficiently).
That article also explains that the eyecandy library “reserves” the seven highest-numbered texture units for audio texture usage. Two more are allocated whenever crossfade is active, and all the rest are available for visualizer usage. However, crossfade also implies that two multipass shaders might temporarily run at the same time, so really half of the remainder is available for any given visualizer.
If you ignore total memory usage (which is actually quite hard to quantify when it comes to runtime GPU usage), taken together, these factors represent the true upper boundary of the most extreme possible multipass scenario.
My GPU reports that it supports 192 texture units. After allocating seven to eyecandy, and two more for crossfade, that leaves 181 texture units. Dividing that in half to accomodate crossfading two multipass shaders, you could say that 90 buffers is theoretically the upper limit of a single multipass shader on my GPU.
Realistically, it’s unlikely my GPU could sustain any useful framerate anywhere near that number, nor does it have enough memory to actually store that many full-resolution textures.
Also, earlier I mentioned that one of the multipass features that I intend to explore is randomized post-processing effects, which should produce a more MilkDrop-like experience. These effects will amount to additional programmatically-added rendering passes, which implies they will add resource allocations to the equation.
While it’s useful to understand the situation, realistically, with any modern hardware you’re not likely to have to be concerned about it.
Conclusion
That concludes my articles about the Monkey Hi Hat music visualizer itself, although I still have a couple more related topics to write about soon.
If you were here simply to learn about multipass rendering, you should check out the demo repository mentioned at the start. Even if you aren’t using the OpenTK .NET wrapper, you won’t have any difficulty translating that into true OpenGL calls in C or C++, or using any other reasonably-thin GL wrapper to do the same thing.
I hope that you enjoy Monkey Hi Hat and…

Comments