
Localhost SSL and IdentityServer4 Token Certificates
Production sites should always require SSL, and developing those sites is easier if localhost supports it – ideally without those annoying browser warnings. We’ll also prepare for IdentityServer token signing and validation, all of which rely on X.509 certificates.
This is a two-part article. In this first installment, we’ll look at the self-signed X.509 certificates that support these features. In the next installment, we’ll put them to use in a real IdentityServer4 project.
Part two is available at: HTTPS in IdentityServer4 and ASP.NET Core 2.
We’ll generate the certificates using convenient Powershell scripts. For SSL support, the scripts will automatically install the certificate files and add the certificate’s public key so that browsers will treat the certificate as if it were issued by a trusted Certificate Authority (CA). This means browsers like Chrome won’t nag you with “Your connection is not private” messages. Of course, the certificate isn’t actually issued by a real CA, so you can’t use it for production SSL – other users out there on the Internet won’t have trusted you as the issuer, so they’ll still see the warning. (There are ways to get free SSL certificates these days, most notably through LetsEncrypt or in some cases through Cloudflare, but that is beyond the scope of this article.)
The Powershell scripts will also automate generation of token signing and token validation certificates for use with IdentityServer4’s AddSigningCredential and AddValidationKey configuration options. In this case, you can use self-signed certificates for both development and production scenarios. In this case, there is no need for a trusted authority, the credentials aren’t being used to assert identity, as in the case of SSL. Think of them as more of an anti-tampering mechanism for IdentityServer’s internal use.
The Powershell scripts in this article are available from this repository.
Generating SSL Credentials
Create a folder for your project credentials, make a new file named cert_make_localhost_ssl.ps1, and add the following script.
1
2
3
4
5
6
7
8
9
10
11
12
13
14
15
16
17
18
19
20
21
22
23
24
25
26
27
28
29
30
31
32
33
34
35
36
37
[CmdletBinding()]
param(
    [Parameter(Mandatory=$true)]
    [string]$password = ""
)

$cwd = Convert-Path .
$cerFile = "$cwd\localhost.cer"
$pfxFile = "$cwd\localhost.pfx"

# abort if files exist
if((Test-Path($pfxFile)) -or (Test-Path($cerFile)))
{
    Write-Warning "Failed, localhost files already exist in current directory."
    Exit
}

# include DnsName property for modern browsers
# https://groups.google.com/a/chromium.org/forum/#!topic/security-dev/IGT2fLJrAeo
$cert = New-SelfSignedCertificate `
    -Subject localhost `
    -DnsName localhost `
    -FriendlyName "Localhost Dev Certificate" `
    -NotBefore (Get-Date) `
    -NotAfter (Get-Date).AddYears(10) `
    -CertStoreLocation "cert:CurrentUser\My" `
    -KeyAlgorithm RSA `
    -KeyLength 2048 `
    -HashAlgorithm SHA256 `
    -KeyUsage DigitalSignature, KeyEncipherment, DataEncipherment `
    -TextExtension @("2.5.29.37={text}1.3.6.1.5.5.7.3.1")

$certStore = 'Cert:\CurrentUser\My\' + ($cert.ThumbPrint)
$securePass = ConvertTo-SecureString -String $password -Force -AsPlainText

Export-PfxCertificate -Cert $certStore -FilePath $pfxFile -Password $securePass
Export-Certificate -Cert $certStore -FilePath $cerFile
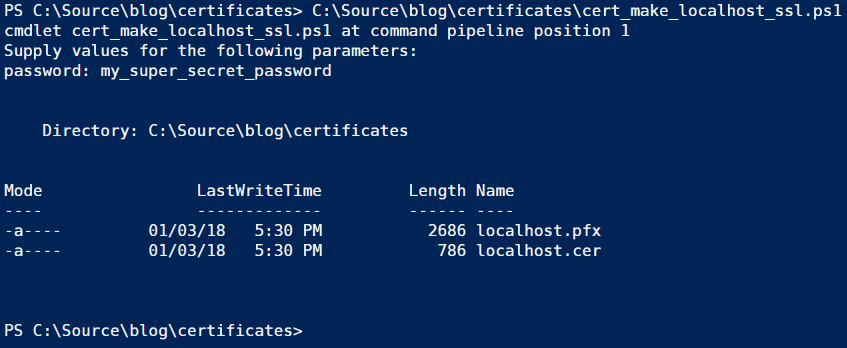
As the name suggests, running this script will generate credentials that can be used for running SSL over localhost. When you run this, it will prompt you for a password. Either choose something you can remember easily, or record it somewhere safe, you’ll need it later. The output is two files, localhost.cer and localhost.pfx. If the files already exist, the script will abort – it will not overwrite existing files. You should also store these files somewhere safe.
Notice the NotAfter parameter specifies a 10-year expiration. For dev purposes there isn’t really any good reason to choose a shorter duration, as is typically the case with live production credentials.
Next, we’ll install the files so they can be used. Create another file in the same folder named cert_install_localhost_ssl.ps1 and add the following script.
1
2
3
4
5
6
7
8
9
10
11
12
13
14
15
16
17
18
19
20
21
22
23
24
25
26
27
28
29
30
31
32
33
34
35
36
37
38
39
40
41
42
[CmdletBinding()]
param(
    [Parameter(Mandatory=$true)][string]$password = ""
)

# must run as admin
if( -not ([Security.Principal.WindowsPrincipal] [Security.Principal.WindowsIdentity]::GetCurrent()).IsInRole([Security.Principal.WindowsBuiltInRole] "Administrator"))
{
    Write-Warning "Failed, must run as Administrator."
    Exit
}

$cwd = Convert-Path .
$pfxFile = "$cwd\localhost.pfx"
$cerFile = "$cwd\localhost.cer"

# abort if files do not exist
if(!(Test-Path($pfxFile)) -or !(Test-Path($cerFile)))
{
    Write-Warning "Failed, no localhost.pfx or localhost.cer in current directory."
    Exit
}

$cert = New-Object System.Security.Cryptography.X509Certificates.X509Certificate2
$cert.Import($cerFile)

$certStore = 'Cert:\CurrentUser\My\' + ($cert.ThumbPrint)
$securePass = ConvertTo-SecureString -String $password -Force -AsPlainText

# try/catch and -erroraction because password failure is a possibility
Try
{
    Import-PfxCertificate -FilePath $pfxFile Cert:\LocalMachine\My -Password $securePass -Exportable -ErrorAction Stop
}
Catch
{
    Write-Warning "Failed, error importing localhost.pfx. Is the password correct?"
    Exit
}

# this launches a wizard
Import-Certificate -FilePath $cerFile -CertStoreLocation Cert:\CurrentUser\Root
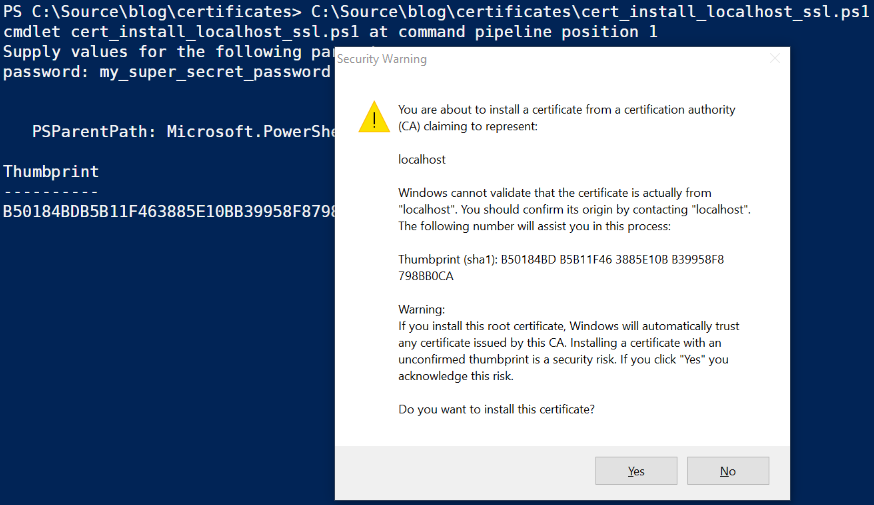
Because this script changes certificate stores, it must be run as Administrator. It will abort with a warning if the user does not have the admin role. It will also abort if the localhost certificate files are not found in the current working directory. The import of the pfx file will throw an exception if the password is incorrect. The script will catch this and abort. Finally, importing the certificate as a trusted issuing authority opens a warning dialog that you must accept to proceed.
You’ll need the certficate thumbprints to activate SSL in Kestrel, but don’t worry about copying them now, we’ll look at another way to retrieve them.
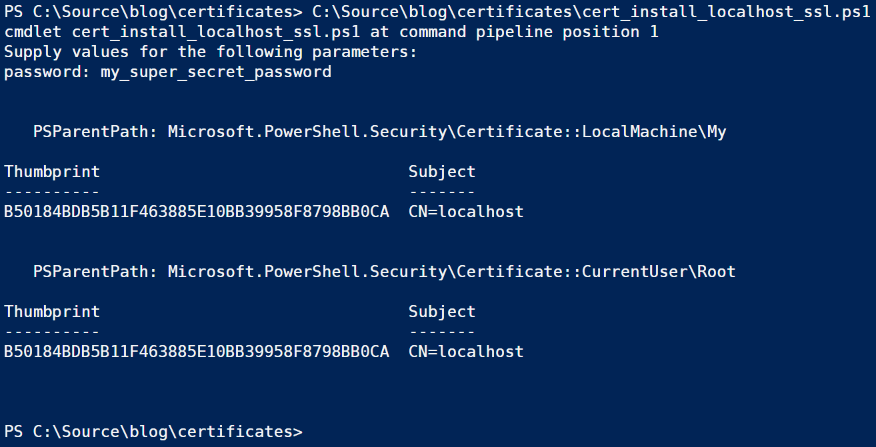
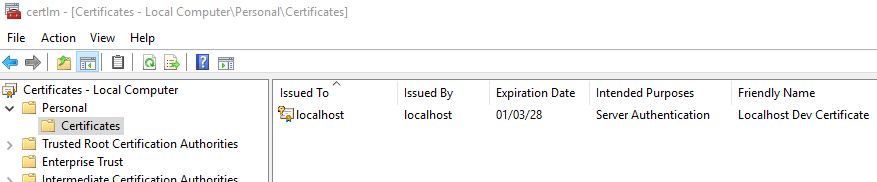
If you open the Start menu and type certlm.msc then hit Enter, you can view the newly-imported certificate. Expand the “Personal” entry in the treeview and click “Certificates” and on the right you’ll see your new localhost credentials, listed as being issued by the “localhost” trusted CA.
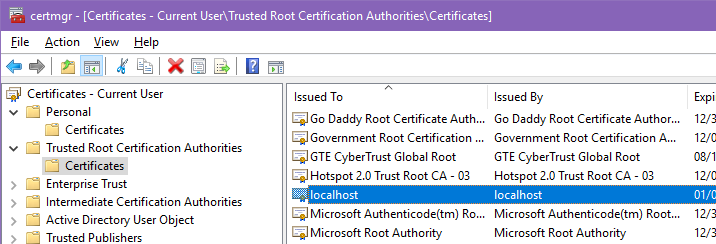
Note you may see multiple localhost certificates listed here. Certain versions of IIS Express have the ability to generate localhost credentials. The certficiate is loaded as a Trusted Authority only for the Current User. To view that certificate store, open the Start menu and type certmgr.msc and hit Enter. Open “Trusted Root Certification Authorities” then “Certificates”, scroll down a bit, and you will see the “localhost” credentials here, as well. The certificate is also in the “Personal” section for Current User.
At this point, anything running as https://localhost is considered a fully trusted, secure site as far as any browser running under your Windows account is concerned. All that remains is to configure your web application projects to run over HTTPS, which I’ll cover in another article in a few days.
IdentityServer Token Credentials
IdentityServer uses very similar X.509 certificates to sign and validate tokens exchanged in various OAuth2 flows. These are also easily generated through Powershell scripts, and as mentioned earlier, you can use these in both development and production scenarios (though you should generate separate tokens for each).
Create a new script file named cert_make_tokens.ps1 and add the following code.
1
2
3
4
5
6
7
8
9
10
11
12
13
14
15
16
17
18
19
20
21
22
23
24
25
26
27
28
29
30
31
32
33
34
35
36
37
38
39
40
41
42
43
44
45
46
47
48
49
50
51
[CmdletBinding()]
param(
    [Parameter(Mandatory=$true)][string]$password = "",
    [Parameter(Mandatory=$true)][string]$rootDomain = ""
)

$cwd = Convert-Path .
$sCerFile = "$cwd\token_signing.cer"
$sPfxFile = "$cwd\token_signing.pfx"
$vCerFile = "$cwd\token_validation.cer"
$vPfxFile = "$cwd\token_validation.pfx"

# abort if files exist
if((Test-Path($sPfxFile)) -or (Test-Path($sCerFile)) -or (Test-Path($vPfxFile)) -or (Test-Path($vCerFile)))
{
    Write-Warning "Failed, token_signing or token_validation files already exist in current directory."
    Exit
}

function Get-NewCert ([string]$name)
{
    New-SelfSignedCertificate `
        -Subject $rootDomain `
        -DnsName $rootDomain `
        -FriendlyName $name `
        -NotBefore (Get-Date) `
        -NotAfter (Get-Date).AddYears(10) `
        -CertStoreLocation "cert:CurrentUser\My" `
        -KeyAlgorithm RSA `
        -KeyLength 4096 `
        -HashAlgorithm SHA256 `
        -KeyUsage DigitalSignature, KeyEncipherment, DataEncipherment `
        -Type Custom,DocumentEncryptionCert `
        -TextExtension @("2.5.29.37={text}1.3.6.1.5.5.7.3.1")
}

$securePass = ConvertTo-SecureString -String $password -Force -AsPlainText

# token signing certificate
$cert = Get-NewCert("IdentityServer Token Signing Credentials")
$store = 'Cert:\CurrentUser\My\' + ($cert.ThumbPrint)
Export-PfxCertificate -Cert $store -FilePath $sPfxFile -Password $securePass
Export-Certificate -Cert $store -FilePath $sCerFile
Write-Host "Token-signing thumbprint: " $cert.Thumbprint

# token validation certificate
$cert =  Get-NewCert("IdentityServer Token Validation Credentials")
$store = 'Cert:\CurrentUser\My\' + ($cert.ThumbPrint)
Export-PfxCertificate -Cert $store -FilePath $vPfxFile -Password $securePass
Export-Certificate -Cert $store -FilePath $vCerFile
Write-Host "Token-validation thumbprint: " $cert.Thumbprint
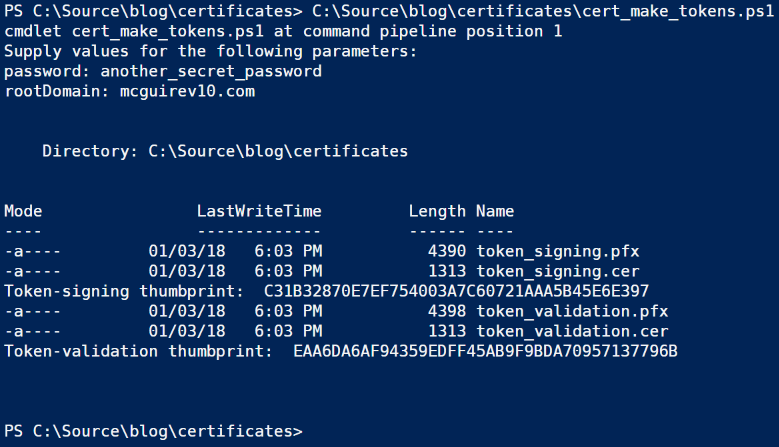
This script is pretty similar to that used to make the SSL credentials. Some of the certificate options have changed. You will be prompted for a password and a root domain name. Technically the domain name doesn’t really matter, as no process will check it, but you might as well tie it to your domain anyway (or localhost for dev credentials). Like the others, it will abort with a warning if any of the token credential files already exist.
As with the SSL certificates, you’ll want to note the password you use, you’ll need it later. This script outputs the certificate thumbprints, too.
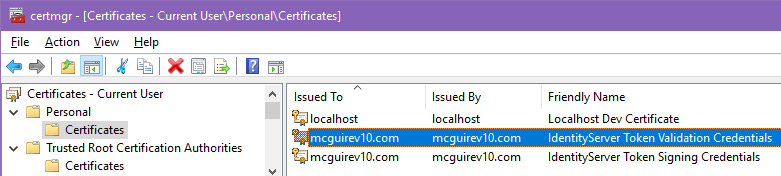
The token certificates are automatically added to the “Personal” section of the “Local Machine” store, which you can verify by running certmgr.msc again (or press F5to refresh if the window is still open).
Forgot to copy those thumbprints when the certs were created? Can’t remember where you wrote them down?
Much of Windows credentials-handling have roots in nearly-ancient operating systems like Windows NT, and sometimes that shows in the tooling. What happens if you forget the thumbprint? Why the handy-dandy futuristic GUI comes to your rescue – double-click the .cer file and whammo, you get a Properties-like dialog with all sorts of cryptic information about the certificate. Way down at the bottom of the list on the Details tab, you can even recover the Thumbprint.
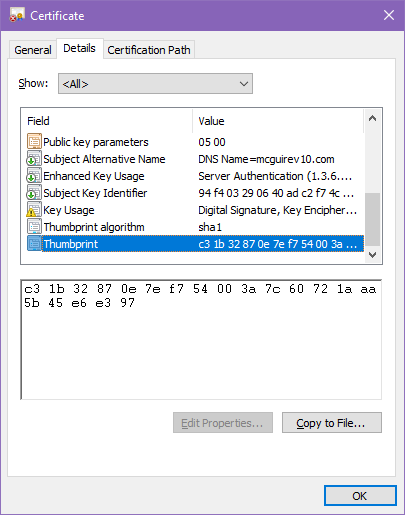
Who doesn’t love typing in long hexadecimal strings? Yes, you can highlight the thumbprint… but you can’t copy it to the clipboard. Why? Back in 1998 when this dialog was probably lashed together, it was also probably 5:30 PM on a Friday when everything finally compiled correctly, and somebody was ready to go home. I’m speculating, of course, I imagine nobody really knows. (The “copy to file” button exports the whole certificate.)
Powershell to the rescue (last one, I promise). Create a file named cert_list_thumbprints.ps1 and put the following code into it.
1
2
3
4
5
6
7
8
9
# Outputs the thumbprint for each .cer file in the current directory

$certList = Get-ChildItem -Path . -Attributes !Directory,!Directory+Hidden -Filter *.cer
foreach ($certFile in $certList)
{
    $cert = New-Object System.Security.Cryptography.X509Certificates.X509Certificate2
    $cert.Import($certFile.FullName)
    Write-Host $cert.Thumbprint " ... " $certFile.Name
}
When you execute this script, you get a dump of the thumbprints of all the .cer files in the folder. Handy. If your Powershell console window has Quick Edit Mode active, just highlight the text with the mouse and click Enter to copy it to the clipboard.

Conclusion
With these four utility scripts, we have everything we need to set up IdentityServer4 and an ASP.NET Core 2.0 client using HTTPS end-to-end, as well as getting rid of the dev-only AddDeveloperSigningCredential configuration item and replacing it with real-world AddSigningCredential and AddValidationKey certificates.
In the next installment, we’ll put all of these certificates to work!

Comments