

Skin WPF Apps Using Only XAML Declarations
No hard-coding: let the XAML do all the work.
Last year, I posted a rant about web-based apps which concluded by suggesting that internally-facing enterprise apps ought to focus more heavily on native Windows UI. Only a few months later, Rick Strahl posted a similar article about the sorry state of web-based UI development, although he isn’t ready to give up on web apps entirely. Much to my surprise, around the same time Microsoft announced .NET Core 3.0 would add Windows-based UI support. You can probably see where I’m going with this.
Recently I decided to put my money where my mouth is and write a WPF version of one of our smaller internal applications which had been in production use as a web app for nearly 20 years. I wrote the original version, it was one of the first web apps deployed in the company, so I was definitely Part of the Problem. Would the Windows app really perform better? Was it really easier to write? Only one way to find out for sure. At this stage I have only completed feature-parity with the web version, but in the process I added some “speculative” window-dressing, including menu items to allow the user to load different skins. (I used the word “theme” in the application, the technical difference between “themes” and “skins” is probably lost on most people, and I suspected “skin” would sound creepy to the average non-technical business user.)
Although WPF skinning is a popular topic, it can be difficult to do well, and it’s the sort of thing you definitely want to design into your application from the very start. Except for “loose” skinning (reading raw XAML files on the fly), most of the “how to” resources you’ll find online rely on a lot of hard-coded references to the skin names. Using the approach in this article allows you to implement app skinning using only XAML declarations, apart from the unavoidable chore of reloading certain controls when a skin changes – but we simplify that as well.
The source code for this article is available on GitHub in my WpfSkinExample repository.
A Good Primer on Skinning
One of the better introductions to WPF skinning I have found is Michael Shpilt’s article, WPF complete guide to Themes and Skins. I recommend reading it – there are several ways to tackle skinning, each with pros and cons. I will use a technique very similar to his first example to demonstrate how to skin your app without the kind of hard-coded references seen in his SkinResourceDictionary implementation.
I greatly appreciated Michael’s article and the useful observations he makes about the benefits and problems of the different ways to implement skinning, but there were a few things I didn’t like about the implementation.
- The
SkinResourceDictionaryrequires one property mapped to each available skin - The
App.Skinproperty is also tightly coupled to the specific available skins - Skin-changes involve multiple calls into
SkinResourceDictionary - Explicit calls required to refresh child controls after loading a skin
- The settings at startup depended upon the declaration order in the XAML
To be clear, I’m not suggesting Michael’s approach is bad or wrong. His examples are simple and easy to understand. They are excellent as a learning aid, and his article is also very important because of the analysis of the pros and cons, which you should review. In fact, the core dictionary-reload technique in my example is exactly the same approach Michael demonstrates. The value in my example is in the all-XAML setup.
Pure XAML Skin Configuration
First I will point out what you need to know to use the example in your own application, then I will circle back to point out a few interesting details in the implementation. The skin files themselves and the basic demo are not that different from Michael’s article, so I won’t spend time on that part. (Seriously, read his article.)
There are several important features to consider in App.xaml:
- Replace the
Applicationtag withlocal:SkinnedApplication - Launch the app with
Startup="Application_Startup"instead of a URI - Identify the
DefaultSkinNamein the application node - Declare
SkinResourceDictionaryresources for each skin XAML file
Notice that each skin declaration has two attributes, SkinName and SkinContent. I wanted to programmatically catalog the skin resources, yet retain the ability to separate the XAML files according to purpose. A combination of the name and content type yields a unique key that still allows us to apply related resources using nothing more than the name of a skin. During startup, we validate that each skin name has all the same types of content.
1
2
3
4
5
6
7
8
9
10
11
12
13
14
15
16
17
18
19
<local:SkinnedApplication x:Class="WpfSkinExample.App"
             xmlns="http://schemas.microsoft.com/winfx/2006/xaml/presentation"
             xmlns:x="http://schemas.microsoft.com/winfx/2006/xaml"
             xmlns:sys="clr-namespace:System;assembly=System"
             xmlns:local="clr-namespace:WpfSkinExample"
             Startup="Application_Startup"
             DefaultSkinName="blue">
    <Application.Resources>
        <ResourceDictionary>
            <ResourceDictionary.MergedDictionaries>
                <local:SkinResourceDictionary SkinName="Blue" SkinContent="Colors" Source="Skins/BlueColors.xaml" />
                <local:SkinResourceDictionary SkinName="Blue" SkinContent="Sizes" Source="Skins/BlueSizes.xaml" />
                <local:SkinResourceDictionary SkinName="Red" SkinContent="Colors" Source="Skins/RedColors.xaml" />
                <local:SkinResourceDictionary SkinName="Red" SkinContent="Sizes" Source="Skins/RedSizes.xaml" />
                <ResourceDictionary Source="Styles/BorderStyling.xaml"/>
            </ResourceDictionary.MergedDictionaries>
        </ResourceDictionary>
    </Application.Resources>
</local:SkinnedApplication>
Because we subclass the Application class that WPF projects normally use, if you drop this file into an existing project (remember to fix the namespaces), Visual Studio will not recognize that it should be treated as App.xaml. When you build the project, it will show an error stating that no Main entrypoint can be found. This entrypoint is in the auto-generated code that VS hides from you in the obj folder. The fix is simple: open the Properties window for App.xaml and set the Build Action to ApplicationDefinition.
Instead of buttons to change skins, I added a menu to MainWindow.xaml. In keeping with the goal of skinning without hard-coding, the menus use a fairly common parameter-passing technique by setting the general-purpose Tag property. Skinning is a UI concern, so we handle the change in a code-behind event-handler. Using the Tag as an event parameter means the code-behind doesn’t need to know which skins are available: it’s just a string value.
1
2
3
4
5
6
<Menu>
    <MenuItem Header="_Themes">
        <MenuItem x:Name="MenuRed" Header="Red and rounded" Tag="red" Click="Theme_Click"/>
        <MenuItem x:Name="MenuBlue" Header="Blue and sharp" Tag="blue" Click="Theme_Click" IsChecked="True"/>
    </MenuItem>
</Menu>
The menu event handler is also where the user’s preferences would be saved. I considered whether this made more sense as a view model command, but the reason App.xaml calls a startup event instead of launching a URI is to allow us to explicitly select the active skin before the window loads. The example doesn’t implement saving and loading preferences, but this seems to clearly define skin preferences as a purely UI concern – we don’t even have a view model to query at this point in the code. Since this article is about skinning and not about menu controls, the other issue I didn’t bother to address here is setting the right menu checkmark for whichever skin is activated at startup.
1
2
3
4
5
6
7
8
9
10
11
12
13
private void Application_Startup(object sender, StartupEventArgs e)
{
    SkinResourceDictionary.ValidateSkins();

    // TODO load user preferences, set menu checkmark to match selected skin

    // without this, we would start with the last skin defined in the XAML
    SkinName = DefaultSkinName;

    // now we can start the party
    MainWindow w = new MainWindow();
    w.Show();
}
I intentionally declared the red skin files last in App.xaml and chose blue as the default to demonstrate that the initialization process works. One of the things I strongly disliked about Michael’s examples is that the skins are sensitive to the order in which they are declared. This example doesn’t suffer from that. If you want to mix the skins and group them by content instead of name, it all still works correctly. This also means you’re free to change the order so that the design view shows whatever skin you’d prefer to see while you work on other parts of the UI.
The final bit of work required to use this in your own app is to reload user controls when the skin changes. Although this looks exactly like Michael’s example, the difference is that it is event-driven. The MainWindow constructor wires this method to the SkinChanged event raised by our SkinnedApplication class and sets up a Dispose call to disconnect it.
1
2
3
4
private void SkinUpdated(object sender, object eventArgs)
{
    SquareContainer.Child = new Square();
}
I plan to revisit this update process in the future. Although reloading controls from the code-behind is clearly a UI-specific concern, I dislike the fact that the code-behind has dependencies on specific XAML values (control names). I would like to find a clean way for user controls to register and unregister themselves for reloading when a skin changes, or perhaps a way to query WPF for dependencies on the skinning resources so that these updates don’t require programmer intervention when the XAML UI is modified. But that’s a project for another day.
Update: After spending several hours trying many different approaches, I don’t think there is a clean and simple way to automate the reload process. I even went so far as to serialize the controls, then deserialize a new instance, using reflection to automatically replace the parent’s Child or Children references, and I still encountered problems. I suppose the best guidance I can offer is to ensure your entire UI is implemented as user controls (no view-model-dependent XAML in MainWindow, for example) and ensure you keep a reference to your view models when you reload affected UI elements so that the new instance can restore state from your view model properties.
Clean MVVM Matters
One difference between Michael’s example and mine is that I’ve added a ListBox to the project.
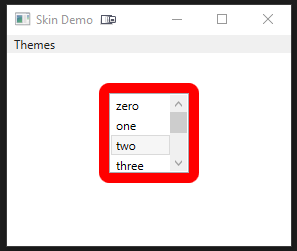
If my proof-of-concept at work pays off, we will be introducing many web app developers to real Windows development, possibly for the first time. I realized that arbitrarily reloading controls when a skin changes is a perfect example of the benefits of an MVVM architecture. The project’s view model is trivial – literally one line of code, a property which is bound to the SelectedIndex property of this control. Thanks to this, when the skin changes and the code-behind creates a new user control, the view model property is there to ensure the correct list entry is selected.
1
2
3
4
5
public class MainWindowViewModel
{
    // this is why MVVM matters...
    public int SelectedIndex { get; set; } = -1;
}
This also demonstrates a subtle mistake in many MVVM projects I have seen – unintentional view model dependencies on view-owned objects. If the view model had instead bound to the SelectedItem property (which is certainly more convenient to use), this example would not work. When the skin change event fires and the handler reloads the control, the view model property now refers to an object that the UI has released. The new ListBoxItem objects all have the same content visually, but they are new, different control instances. The view doesn’t recognize the object in the view model property and so nothing is selected upon reload. This is a violation of MVVM because it creates a very fragile dependency on the view from the view model. (I also noticed that binding to SelectedValue does not work. I don’t normally use SelectedValue but I suspect it requires a converter, or perhaps SelectedValuePath is also required. I imagine the fix is trivial.)
Code Notes
The secret sauce in my SkinResourceDictionary class is a private dictionary that stores the Source URIs keyed on a (string name, string content) tuple where those values map to the SkinName and SkinContent XAML attributes. This presented an interesting challenge – I needed two valid properties before I could store the URI. What order were they set in? Furthermore, I should clean up old items if the user edits the XAML and changes one of the values. The solution was to implement the ISupportInitialize interface, which allows the class to behave differently during deserialization.
1
2
3
4
5
6
7
8
9
10
11
12
13
14
15
public new void BeginInit()
{
    IsInitializing = true;
    base.BeginInit();
}

public new void EndInit()
{
    if (string.IsNullOrWhiteSpace(SkinName)) throw new Exception($"The property \"{nameof(SkinName)}\" is missing");
    if (string.IsNullOrWhiteSpace(SkinContent)) throw new Exception($"The property \"{nameof(SkinContent)}\" is missing");
    base.EndInit();
    if (skinUris.ContainsKey((SkinName, SkinContent))) skinUris.Remove((SkinName, SkinContent));
    skinUris.Add((SkinName, SkinContent), Source);
    IsInitializing = false;
}
As a cool bonus, the deserialization transaction should allow us to present a professional-looking warning when one of the required properties is missing or incorrect. However, there seems to be a bug in the XAML designer relating to ResourceDictionary subclasses. As soon as a subclassed property is referenced, the designer shows an “Object does not match target type” exception, and the code shown above doesn’t run. I’ve asked about it on StackOverflow here, I’ll update the article and code if someone finds a solution.

The only other code worth mentioning is the ActiveSkin setter in the SkinnedApplication abstract class. This just tracks the name of the currently-selected skin and raises the change event. The actual resource-update process is offloaded to the SkinResourceDictionary class, which I thought was a cleaner separation of concerns.
Other Reading
This StackOverflow answer provides a handy list of what to skin and some thoughts about how to plan for it:
If you want to store your skin files in an external assembly, have a look at this article:
WPF Resource Dictionary Basics
Look vs Layout
I didn’t want to add complexity to this project, but an idea I may explore in the future is treating layout as a separate type of skinning operation from visual effects like colors and fonts. The implementation should be easy – a third custom property on SkinResourceDictionary to differentiate between the two groups and another dictionary key value in the tuple. Then it would be a matter of following the same pattern already used to apply the resources according to SkinName. Validation would also have to change (layout resources shouldn’t be required to have the same skin categories as visual resources). This extra level of classification would allow the app developer to decide what groups were available purely from the XAML, once again yielding the all-XAML benefits already demonstrated here.
Conclusion
Back at the office, my WPF-based proof-of-concept was an instant hit. Not surprisingly, it significantly outperforms the web based equivalent in every way. It uses a quarter of the memory, it looks better and has a more flexible UI, there is one tenth as much code to write and maintain, which directly translates into lower TCO, and I wrote near-production-quality code in just six days. I estiamte the web version would require several _weeks__ to write from scratch (there is a lot of mainframe querying and complex data presentation and selection, all of which is easy in WPF).
And thanks to the techniques presented here, by the time everyone gets into the office on Monday morning, my proof-of-concept will have added the ability to swap skins on the fly!


Comments