

Blazor Authentication with OpenID Connect
Blazor OIDC login, logout, and anonymous access with IdentityServer
This article briefly covers how to get OIDC authorization working for a Blazor server-side web app. We’ll use IdentityServer4’s publicly-available demo server which allows anyone to perform an OIDC login, since the OIDC authority isn’t really important here.
I had three goals for this article: login, logout, and some level of support for anonymous access. I found a lot of articles and StackOverflow questions that seem to partly address the problem, but I couldn’t find a fully-working project. The code is available on my GitHub repository at MV10/BlazorOIDC. The project is based upon ASP.NET Core 3.1.
A follow-up article is now available: Blazor Login Expiration with OpenID Connect. Note that the repository now reflects the changes from this new article. Generally they’re additions to the code shown in this article.
I should also note this is only concerned with the Blazor server-side rendering model. I make my living building in-house enterprise apps, and the download-heavy all-local WebAssembly client-side model doesn’t make much sense when everybody is on the same network and I know I can deploy to a large web farm of high-end servers. I’m also not thrilled with how far behind .NET Core the Xamarian framework is lagging (having experienced that first-hand after a few years of working on games in Unity, which is even further behind). WebAssembly is very cool, but I’m just not a fan of the “one giant download” model, especially if I’m still constrained to the use of the twin trainwrecks of our age, HTML and CSS.
Updating the Template
I began with an off-the-shelf Blazor server-side app template without ASP.NET Core Identity support of any kind. It isn’t too important for our purposes, but the 3.1 template is lagging behind the libraries, so using the information documented here, we update App.razor to match:
1
2
3
4
5
6
7
8
9
10
11
12
13
14
15
16
17
18
19
20
21
22
23
<Router AppAssembly="@typeof(Program).Assembly">
    <Found Context="routeData">
        <AuthorizeRouteView RouteData="@routeData" DefaultLayout="@typeof(MainLayout)">
            <NotAuthorized>
                <h1>Sorry</h1>
                <p>You're not authorized to reach this page.</p>
                <p>You may need to log in as a different user.</p>
            </NotAuthorized>
            <Authorizing>
                <h1>Authentication in progress</h1>
                <p>Only visible while authentication is in progress.</p>
            </Authorizing>
        </AuthorizeRouteView>
    </Found>
    <NotFound>
        <CascadingAuthenticationState>
            <LayoutView Layout="@typeof(MainLayout)">
                <h1>Sorry</h1>
                <p>Sorry, there's nothing at this address.</p>
            </LayoutView>
        </CascadingAuthenticationState>
    </NotFound>
</Router>
User Info in Razor Components
In a Blazor server-side application, authenticated user information is available to Razor components by injecting the AuthenticationStateProvider. We’ll modify Index.razor to show some information about the authenticated user.
1
2
3
4
5
6
7
8
9
10
11
12
13
14
15
16
17
18
19
20
21
22
23
24
25
26
27
28
@page "/"
@inject AuthenticationStateProvider AuthState

<h1>Hello, @Username</h1>

<p>Welcome to your new app.</p>

<p>
    <a href="/Logout">Logout</a>
</p>

@code
{
    private string Username = "Anonymous User";

    protected override async Task OnInitializedAsync()
    {
        var state = await AuthState.GetAuthenticationStateAsync();

        Username =
            state.User.Claims
            .Where(c => c.Type.Equals("name"))
            .Select(c => c.Value)
            .FirstOrDefault() ?? string.Empty;

        await base.OnInitializedAsync();
    }
}
Later we’ll take steps to ensure the user can’t reach this content unless they’re authenticated, so it’s safe to simply assume user information is available. Unfortunately the default OIDC settings don’t populate properties like User.Identity.Name, so we use a bit of LINQ to extract the name claim.
We’ll implement the /Logout link later.
Configure OIDC in Startup
The OIDC configuration process in Startup.cs is pretty similar to a non-Blazor MVC application. First, add a NuGet package reference to Microsoft.AspNetCore.Authentication.OpenIdConnect. Add this to the end of the ConfigureServices method:
1
2
3
4
5
6
7
8
9
10
11
12
13
14
15
16
17
18
19
20
21
22
23
24
25
services.AddAuthentication(options =>
{
    options.DefaultScheme = "Cookies";
    options.DefaultChallengeScheme = "oidc";
})
.AddCookie("Cookies")
.AddOpenIdConnect("oidc", options =>
{
    options.Authority = "https://demo.identityserver.io/";
    options.ClientId = "interactive.confidential.short"; // 75 seconds
    options.ClientSecret = "secret";
    options.ResponseType = "code";
    options.SaveTokens = true;
    options.GetClaimsFromUserInfoEndpoint = true;

    options.Events = new OpenIdConnectEvents
    {
        OnAccessDenied = context =>
        {
            context.HandleResponse();
            context.Response.Redirect("/");
            return Task.CompletedTask;
        }
    };
});
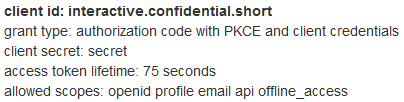
The OIDC client information comes from the IdentityServer demo site. That particular client ID is configured for quick expiration (75 seconds) which is very useful for quick tests:
The OpenIdConnectEvents handler just redirects the user to the site root when an OIDC access_denied message is returned from the login server. Unfortunately, this message is also returned if the user clicks the Cancel button in the IdentityServer UI, which is why we’re handling it this way. I haven’t investigated yet whether this is just a quirk of the demo server, or if OIDC itself doesn’t offer a good way to differentiate between user bail-out versus a failed login attempt.
After that code, we add a few more lines of code borrowed from the MVC Authorization Policy world:
Update: The follow-up article (Blazor Login Expiration with OpenID Connect) explains why this addition is unnecessary, and in fact does nothing useful.
1
2
3
4
5
6
7
services.AddMvcCore(options =>
{
    var policy = new AuthorizationPolicyBuilder()
        .RequireAuthenticatedUser()
        .Build();
    options.Filters.Add(new AuthorizeFilter(policy));
});
The RequireAuthenticatedUser policy locks down the entire site by default. This means you don’t have to sprinkle every corner of your codebase with authentication attributes and tests. When an anonymous user accesses the site, they’re automatically and immediately redirected to the login server.
Unfortunately, that interferes with two of my three goals: anonymous access and logout. (Actually, logout is still possible, but the user is immediately redirected back to the server to perform a login again.)
Before we address that problem, we have one more line of code to add down in the Configure method, after UseStaticFiles and UseRouting calls:
1
2
3
app.UseStaticFiles();
app.UseAuthentication(); // add this
app.UseRouting();
At this point you can run the project and you’ll have full OIDC login support, although the /Logout link we added to Index.razor doesn’t do anything yet.
Anonymous Access
I figure the most common use-case for secured web applications is to have the entire site secured by default, with only a small area accessible anonymously. For public sites, this might be “About” pages and instructions for registering a new account, and in an internal enterprise line-of-business application, it could be instructions about how to request access to the system. Unfortunately, the RequireAuthenticatedUser policy blindly kicks off login for any anonymous user.
In the MVC world, there is a very useful AllowAnonymous attribute, but Blazor ignores it. However, we can put it to work in the _Hub.cshtml file because that’s a true Razor page. Then we conditionally emit the Blazor client-side hub content or content specific to anonymous users. We add this to the top of the file:
1
2
@using Microsoft.AspNetCore.Authorization
@attribute [AllowAnonymous]
Then we simply check User.Identity.IsAuthenticated within the <body> tag:
1
2
3
4
5
6
7
8
9
10
11
12
13
14
15
16
17
18
<body>
    @if (User.Identity.IsAuthenticated)
    {
        <app>
            <component type="typeof(App)" render-mode="ServerPrerendered" />
        </app>

        <script src="_framework/blazor.server.js"></script>
    }
    else
    {
        <h3>You are not logged into this application.</h3>

        <p>
            <a href="/Login">Login</a>
        </p>
    }
</body>
If you run the application after these changes, assuming you don’t have a login cookie active from a previous run, you will see the “You are not logged into this application” message. Like the /Logout link added to Index.razor at the beginning of the article, the /Login link after that message doesn’t do anything yet, but that’s an easy fix.
Login and Logout
We’re going to use a pair of Razor Page OnGet handlers to address login and logout. Create a class called _HostAuthModel.cs in the Pages folder:
1
2
3
4
5
6
7
8
9
10
11
12
13
14
15
16
17
18
19
public class _HostAuthModel : PageModel
{
    public IActionResult OnGetLogin()
    {
        return Challenge(AuthProps(), "oidc");
    }

    public async Task OnGetLogout()
    {
        await HttpContext.SignOutAsync("Cookies");
        await HttpContext.SignOutAsync("oidc", AuthProps());
    }

    private AuthenticationProperties AuthProps()
        => new AuthenticationProperties
        {
            RedirectUri = Url.Content("~/")
        };
}
Two changes are required at the start of _Host.cshtml – you must tell the @page directive to expect a handler parameter, and you have to wire up the class as the page model:
1
2
@page "/{handler?}
@model _HostAuthModel
The {handler?} parameter and how it relates to the model code is another one of a million little ASP.NET “conventions” that you just need to magically be aware of, which is annoying, but I have to admit it’s all pretty concise and simple once you figure out what to do.
And now if you run the project, everything works as expected. That’s all it takes.
Expiration Problem
Unfortunately, there is a minor problem with this approach – the login will never expire. This is cookie-based authorization, but Blazor server-side works over SignalR connections. Those are glorified websocket connections which do not have HTTP concepts, including cookies. Even more unfortunately, Microsoft’s current position on the problem seems to be, “We’ll think about it some day, go figure it out for yourself.”
There is a way to make it work, and in the next article, that’s what we’ll do.
Update: The follow-up article is now available: Blazor Login Expiration with OpenID Connect.
No Easy Alternatives
I explored the possibility of creating a Blazor-specific OIDC authentication scheme which didn’t depend on HttpContext or cookies at all, but unfortunately the current ASP.NET Core authentication base classes assume HttpContext is available (for example, it’s part of the initialization call in the abstract AuthenticationHandler class). The middleware (registered via UseAuthentication in the Configure method) is also currently built upon the assumption of a primarily HTTP-oriented processing pipeline.
It would still be possible to create a scheme to store credentials that isn’t cookie-based, but if you have to use HttpContext you might as well use cookies, too. To avoid HTTP, however, would require writing a completely parallel authentication library that replicated most of the core security features of the framework – a very non-trivial task, particularly since the architecture is not well-documented and has few comments in the code.
Conclusion
It took me a few days to puzzle my way through this, but it turned out to be pretty simple. It doesn’t allow for very complex anonymous content. If your system has the opposite scenario – it needs a few secured features but is mostly open to anonymous use – the solution is to define specific authorization policies and decorate the secured content.


Comments