

Storing X509 Certificates in Azure Key Vault
This article demonstrates storing and retrieving X.509 certificates to Azure Key Vault. This is useful for ASP.NET Core’s Data Protection feature, as well as sharing IdentityServer4’s token credentials.
Update
The comments below are no longer accurate. In a later release of .NET Core, Microsoft added support for decryption, but I’ll leave the old update because it is discussed in the comments.
In February of 2018, I added this update:
Data Protection API: Unfortunately, this technique is not particularly useful for use with the Data Protection API.
It’s still a useful technique for X.509 dependencies like Identity Server’s token credentials.
Inexplicably, the DPAPI ProtectKeysWithCertificate override which accepts an X509Certificate2 object is able to encrypt sensitive data with the provided certificate, but decryption fails with an Unable to retrieve the decryption key exception unless the key is also in the local user’s certificate store. This means the override is effectively pointless.
Why? Who knows. Microsoft blows off inquiries with vague explanations about “underlying framework limitations” (don’t they get paid to fix those?), when they don’t just close the thread with no explanation at all.
Back to the Old Article…
This article will build upon tools and concepts presented in two recent posts:
- Easy Configuration Sharing with Azure Key Vault
- Localhost SSL and IdentityServer4 Token Certificates
We’ll create a new Powershell script to generate a certificate for ASP.NET Core’s Data Protection feature, another Powershell script to serialize and upload X.509 certificate PFX files to Azure Key Vault, and expand the GetSecret utility class to retrieve, cache, and deserialize those certificates on demand. Finally, we’ll explore how to leverage the new capabilities in an ASP.NET Core application and in Identity Server.
The Powershell scripts in this article are available from this repository.
ASP.NET Core Data Protection
The Data Protection (DPAPI) feature of ASP.NET Core is meant to protect “data at rest” – data that is persisted to some type of storage medium. This may be data your program explicitly stores by calling DPAPI methods like Protect and Unprotect, but it also applies to certain pieces of data ASP.NET Core stores automatically, including login data. If you do not provide an X.509 certificate for these cryptography operations, DPAPI will automatically generate a new key upon startup. This means anything stored in a previous session – such as login tokens – are no longer decipherable from a new session. Also, in a webfarm setting, providing a centralized storage mechanism along with a shared cryptography certificate means all servers can read each other’s data securely.
First we’ll create a new Powershell script named cert_make_dpapi.ps1 with the following content.
1
2
3
4
5
6
7
8
9
10
11
12
13
14
15
16
17
18
19
20
21
22
23
24
25
26
27
28
29
30
31
32
33
34
35
36
[CmdletBinding()]
param(
    [Parameter(Mandatory=$true)][string]$password = "",
    [Parameter(Mandatory=$true)][string]$rootDomain = ""
)

$cwd = Convert-Path .
$CerFile = "$cwd\aspnet_dpapi.cer"
$PfxFile = "$cwd\aspnet_dpapi.pfx"

# abort if files exist
if((Test-Path($PfxFile)) -or (Test-Path($CerFile)))
{
    Write-Warning "Failed, aspnet_dpapi already exists in $cwd"
    Exit
}

$cert = New-SelfSignedCertificate `
        -Subject $rootDomain `
        -DnsName $rootDomain `
        -FriendlyName "ASP.NET Data Protection $rootDomain" `
        -NotBefore (Get-Date) `
        -NotAfter (Get-Date).AddYears(10) `
        -CertStoreLocation "cert:CurrentUser\My" `
        -KeyAlgorithm RSA `
        -Provider "Microsoft Enhanced RSA and AES Cryptographic Provider" `
        -KeyLength 2048 `
        -KeyUsage KeyEncipherment, DataEncipherment

$store = 'Cert:\CurrentUser\My\' + ($cert.ThumbPrint)
$securePass = ConvertTo-SecureString -String $password -Force -AsPlainText

Export-Certificate -Cert $store -FilePath $CerFile
Export-PfxCertificate -Cert $store -FilePath $PfxFile -Password $securePass

Write-Host "aspnet_dpapi thumbprint: " $cert.Thumbprint
This script is similar to the certificate scripts from the earlier article, except that a DPAPI certificate drops a few settings, and importantly, it specifies Microsoft Enhanced RSA and AES Cryptographic Provider as the cryptography service provider used to generate the certificate.
Executing the script prompts for a password and the domain (which isn’t strictly necessary), then generates two aspnet_dpapi files in the working directory.
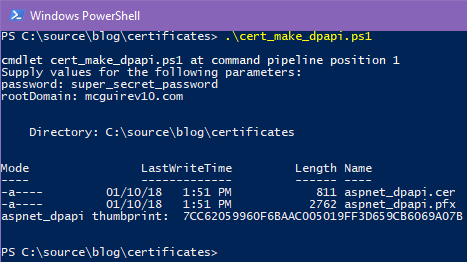
Like the earlier certificate scripts, we dump the thumbprint, but when we store the certificates in Azure Key Vault, we won’t need to refer to thumbprints any longer.
Azure Configuration
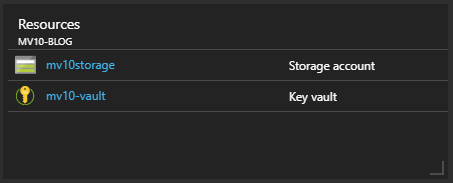
Since this article involves Azure, I set up a new resource group which contains a Key Vault resource named mv10-vault and a Storage account named mv10storage. Additionally, the Storage account’s Blob storage has a container named asp-net-data-protection-api that is set to Private access, with CORS configured to match my local IP address.
Upload Certificates to Key Vault
Azure Key Vault recently added support for certificates, however, that capability only returns public information about the certificates. In order to use certificates for encryption or signing, we need the private key that only exists in the PFX file. Therefore, we upload the PFX as a Key Vault secret (name/value pair with the value securely encrypted).
Create a new Powershell script named cert_upload_azure_pfx.ps1 with the following content.
1
2
3
4
5
6
7
8
9
10
11
12
13
14
15
16
17
18
19
20
21
22
23
24
25
26
27
28
29
30
31
32
33
34
35
36
37
38
39
40
41
42
43
44
45
46
47
48
49
50
51
52
53
54
55
56
57
58
59
60
61
62
63
64
65
66
[CmdletBinding()]
param(
    [Parameter(Mandatory=$true)][string]$password = "",
    [Parameter(Mandatory=$true)][string]$pfxFilename = "",
    [Parameter(Mandatory=$true)][string]$keyVaultName = "",
    [Parameter(Mandatory=$true)][string]$secretName = ""
)

$cwd = Convert-Path .
$pfxFile = "$cwd\$pfxFilename.pfx"

# abort when file not found
if(!(Test-Path($pfxFile)))
{
    Write-Warning "Failed, $pfxFilename.pfx not found $cwd"
    Exit
}

# force Azure login, if needed
function CheckLogin
{
    $needLogin = $true
    Try
    {
        $content = Get-AzureRmContext
        if ($content)
        {
            $needLogin = ([string]::IsNullOrEmpty($content.Account))
        }
    }
    Catch
    {
        if ($_ -like "*Login-AzureRmAccount to login*")
        {
            $needLogin = $true
        }
        else
        {
            throw
        }
    }

    if ($needLogin)
    {
        Login-AzureRmAccount
    }
}

CheckLogin

# load the PFX
$flag = [System.Security.Cryptography.X509Certificates.X509KeyStorageFlags]::Exportable
$coll = New-Object System.Security.Cryptography.X509Certificates.X509Certificate2Collection
$coll.Import($pfxFile, $password, $flag)

# export to byte array
$type = [System.Security.Cryptography.X509Certificates.X509ContentType]::Pkcs12
$bytes = $coll.Export($type)

# base64 encode
$base64 = [System.Convert]::ToBase64String($bytes)
$value = ConvertTo-SecureString -String $base64 -AsPlainText –Force

# send it to Azure KeyVault
$type = 'application/x-pkcs12'
Set-AzureKeyVaultSecret -VaultName $keyVaultName -Name $secretName -SecretValue $value -ContentType $type
There is quite a bit going on in this script. It takes four parameters – the certificate password, the base filename, the name of your Key Vault, and the name to store the certificate under in the Key Vault secret area. After verifying the file exists, it jumps through some hoops to either confirm you’re logged into Azure, or to prompt you for login. Next, it imports the certificate PFX, re-exports it as a byte-array, converts that to Base64, and finally, it uploads the results to Azure.
Note this will overwrite any existing secret by the same name.
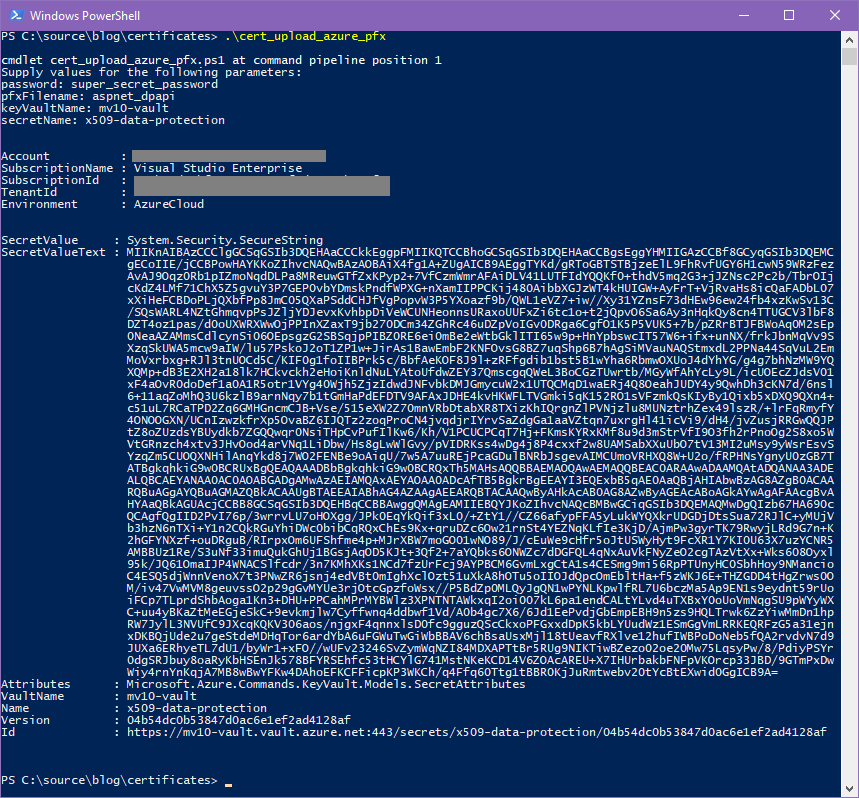
And sure enough, over in the Azure Portal, we can see our new secrets.

You can see I’ve also uploaded the IdentityServer4 token credentials using the same process. These types of certificates produce a slightly different output, as shown below.

Certificate Retrieval
See update. Returning an X509Certificate2 object is not useful for DPAPI due to mysterious “framework limitations”.
In an earlier article we created a couple of helper classes to retrieve and cache Key Vault secrets. We’ll modify that project.
First, add this using statement to the class:
1
using System.Security.Cryptography.X509Certificates;
Next, add three new public methods to the GetSecret class, plus a private method that converts a string back into a .NET X502Certificate2 object.
1
2
3
4
5
6
7
8
9
10
11
12
13
public static async Task<X509Certificate2> DataProtectionCertificate() => PfxStringToCert(await KeyVaultCache.GetCachedSecret("x509-data-protection"));

public static async Task<X509Certificate2> TokenSigningCertificate() => PfxStringToCert(await KeyVaultCache.GetCachedSecret("x509-token-signing"));

public static async Task<X509Certificate2> TokenValidationCertificate() => PfxStringToCert(await KeyVaultCache.GetCachedSecret("x509-token-validation"));

private static X509Certificate2 PfxStringToCert(string pfx)
{
    var bytes = Convert.FromBase64String(pfx);
    var coll = new X509Certificate2Collection();
    coll.Import(bytes, null, X509KeyStorageFlags.Exportable);
    return coll[0];
}
Retrieval is as simple as calling async GetSecret.DataProtectionCertificate().
Configuring Data Protection
Next, we’ll configure Data Protection by using our new helper methods in the IdentityServer4 and client web app created in this article. Open the solution and create a reference to the helper assemblies.
Now open the Startup.cs for both Identity Server and the client web app.
If you followed my earlier Key Vault article exactly, you should add the following using statement to both Startup classes. Otherwise, add whatever using matches the namespace in your helper library.
1
using mv10_azure_library.KeyVault;
Now add the following code at the very top of the ConfigureServices method in both Startup classes.
Important: Data Protection must be configured before the call to services.AddMvc. Data Protection is used within AddMvc processing, so the correct storage and certificate configuration must be established first.
See update. Returning an X509Certificate2 object is not useful for DPAPI due to mysterious “framework limitations”.
1
2
3
4
5
6
7
8
9
var blobAccount = CloudStorageAccount.Parse(GetSecret.StorageConnectionString().GetAwaiter().GetResult());
var blobClient = storageAccount.CreateCloudBlobClient();
var storageContainer = storageClient.GetContainerReference("asp-net-data-protection-api");
services.AddDataProtection()
    .SetApplicationName("mcguirev10.com")
    .ProtectKeysWithCertificate(GetSecret.DataProtectionCertificate().GetAwaiter().GetResult())
    .PersistKeysToAzureBlobStorage(storageContainer, "keys.xml");

services.AddMvc( ssl, https, etc )...
The command of interest is ProtectKeysWithCertificate. One of the overrides accepts an X502Certificate2 object, which is what our helper class deserializes from Azure Key Vault.
Notice also the call to the GetSecret.StorageConnectionString helper method, which was created in the earlier article. The blob and storage references, and the call to PersistKeysToAzureBlobStorage ensures the key information is stored where multiple app instances can find it. Centralized storage options for DPAPI key data is reasonably well documented, so I won’t go into any detail about that here.
We must use the .GetAwaiter().GetResult() approach to process the awaitable methods in a synchronous fashion. Microsoft has posted on GitHub that a future version of ASP.NET Core will add asynchronous Task-based Startup support. Hopefully we’ll see that in ASP.NET Core 3.
If you build and run the projects now, you won’t see anything different. Startup may take a few seconds longer since there are a couple round-trips to Azure, but honestly I haven’t seen a big difference. My Azure Portal shows my Key Vault responds very quickly, usually 80-100ms.
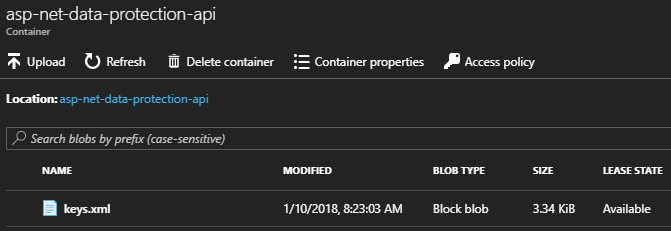
However, if you check the Azure Storage blob container, you will see that it now contains a keys.xml file.
Identity Server Token Credentials
Referencing the token-signing and token-validation credentials used by Identity Server is equally simple. Towards the end of the ConfigureServices method for the Identity Server project, locate the AddSigningCredential and AddValidationKey calls and change them as follows.
1
2
3
4
services.AddIdentityServer()
    .AddSigningCredential(GetSecret.TokenSigningCertificate().GetAwaiter().GetResult())
    .AddValidationKey(GetSecret.TokenValidationCertificate().GetAwaiter().GetResult())
    // other config steps omitted
No surprises here. Once again, there is no visible change when you build and run this code, but now you can run multiple instances of Identity Server, and they can all consume one another’s tokens.
Conclusion
The earlier article demonstrated how Azure Key Vault makes a convenient, secure shared storage point for configuration data. This article is really just an extension of that concept. The usual way of working with certificates in Azure involves a lot of configuration work on each App Service. By applying the techniques shown here, you eliminate all of that effort (the exception is installing SSL certificates, which must be applied to the actual web servers directly).

Comments